跳到主要内容

· 阅读需 22 分钟

在这篇博客文章中,我们将探索如何使用 EntAtlaspgvector 构建一个 RAG(检索增强生成)系统。

RAG 是一种通过整合检索步骤来增强生成模型能力的技术。我们不再仅仅依赖模型的内部知识,而是可以从外部数据源检索相关文档或数据,并使用这些信息来生成更准确、更具上下文感知的响应。这种方法在构建问答系统、聊天机器人或任何需要最新信息或特定领域知识的场景中特别有用。

设置 Ent Schema

让我们通过初始化项目所需的 Go 模块来开始本教程:

go mod init github.com/rotemtam/entrag # Feel free to replace the module path with your own

在这个项目中,我们将使用 Ent(一个 Go 语言的实体框架)来定义我们的数据库 schema。数据库将存储我们想要检索的文档(分块到固定大小)以及表示每个分块的向量。运行以下命令初始化 Ent 项目:

go run -mod=mod entgo.io/ent/cmd/ent new Embedding Chunk

这个命令会为我们的数据模型创建占位文件。我们的项目结构应该如下所示:

├── ent
│ ├── generate.go
│ └── schema
│ ├── chunk.go
│ └── embedding.go
├── go.mod
└── go.sum

接下来,让我们定义 Chunk 模型的 schema。打开 ent/schema/chunk.go 文件并按如下方式定义 schema:

ent/schema/chunk.go
package schema

import (
"entgo.io/ent"
"entgo.io/ent/schema/edge"
"entgo.io/ent/schema/field"
)

// Chunk holds the schema definition for the Chunk entity.
type Chunk struct {
ent.Schema
}

// Fields of the Chunk.
func (Chunk) Fields() []ent.Field {
return []ent.Field{
field.String("path"),
field.Int("nchunk"),
field.Text("data"),
}
}

// Edges of the Chunk.
func (Chunk) Edges() []ent.Edge {
return []ent.Edge{
edge.To("embedding", Embedding.Type).StorageKey(edge.Column("chunk_id")).Unique(),
}
}

这个 schema 定义了一个具有三个字段的 Chunk 实体:pathnchunkdatapath 字段存储文档的路径,nchunk 存储分块编号,data 存储分块的文本数据。我们还定义了一个指向 Embedding 实体的边,该实体将存储分块的向量表示。

在继续之前,让我们安装 pgvector 包。pgvector 是一个 PostgreSQL 扩展,提供对向量操作和相似性搜索的支持。我们需要它来存储和检索分块的向量表示。

go get github.com/pgvector/pgvector-go

接下来,让我们定义 Embedding 模型的 schema。打开 ent/schema/embedding.go 文件并按如下方式定义 schema:

ent/schema/embedding.go
package schema

import (
"entgo.io/ent"
"entgo.io/ent/dialect"
"entgo.io/ent/dialect/entsql"
"entgo.io/ent/schema/edge"
"entgo.io/ent/schema/field"
"entgo.io/ent/schema/index"
"github.com/pgvector/pgvector-go"
)

// Embedding holds the schema definition for the Embedding entity.
type Embedding struct {
ent.Schema
}

// Fields of the Embedding.
func (Embedding) Fields() []ent.Field {
return []ent.Field{
field.Other("embedding", pgvector.Vector{}).
SchemaType(map[string]string{
dialect.Postgres: "vector(1536)",
}),
}
}

// Edges of the Embedding.
func (Embedding) Edges() []ent.Edge {
return []ent.Edge{
edge.From("chunk", Chunk.Type).Ref("embedding").Unique().Required(),
}
}

func (Embedding) Indexes() []ent.Index {
return []ent.Index{
index.Fields("embedding").
Annotations(
entsql.IndexType("hnsw"),
entsql.OpClass("vector_l2_ops"),
),
}
}

这个 schema 定义了一个 Embedding 实体,包含一个类型为 pgvector.Vectorembedding 字段。embedding 字段存储分块的向量表示。我们还定义了一个指向 Chunk 实体的边,以及一个使用 hnsw 索引类型和 vector_l2_ops 操作符类的 embedding 字段索引。这个索引将使我们能够对嵌入向量执行高效的相似性搜索。

最后,让我们通过运行以下命令生成 Ent 代码:

go mod tidy
go generate ./...

Ent 将根据 schema 定义为我们的模型生成必要的代码。

设置数据库

接下来,让我们设置 PostgreSQL 数据库。我们将使用 Docker 在本地运行 PostgreSQL 实例。由于我们需要 pgvector 扩展,我们将使用 pgvector/pgvector:pg17 Docker 镜像,该镜像已预装了该扩展。

docker run --rm --name postgres -e POSTGRES_PASSWORD=pass -p 5432:5432 -d pgvector/pgvector:pg17

我们将使用 Atlas(一个与 Ent 集成的数据库 schema 即代码工具)来管理我们的数据库 schema。运行以下命令安装 Atlas:

curl -sSfL https://atlasgo.io/install.sh | sh

有关其他安装选项,请参阅 Atlas 安装文档

由于我们要管理扩展,我们需要一个 Atlas Pro 帐户。您可以通过运行以下命令注册免费试用:

atlas login
不使用迁移工具

如果您想跳过使用 Atlas,可以使用此文件中的语句直接将所需的 schema 应用到数据库

现在,让我们创建基础配置 base.pg.hcl,它为 public schema 提供 vector 扩展:

base.pg.hcl
schema "public" {
}

extension "vector" {
schema = schema.public
}

现在,让我们创建 Atlas 配置,它将 base.pg.hcl 文件与 Ent schema 组合在一起:

atlas.hcl
data "composite_schema" "schema" {
schema {
url = "file://base.pg.hcl"
}
schema "public" {
url = "ent://ent/schema"
}
}

env "local" {
url = getenv("DB_URL")
schema {
src = data.composite_schema.schema.url
}
dev = "docker://pgvector/pg17/dev"
}

此配置定义了一个包含 base.pg.hcl 文件和 Ent schema 的复合 schema。我们还定义了一个名为 local 的环境,它使用复合 schema,我们将用于本地开发。dev 字段指定开发数据库 URL,Atlas 使用它来规范化 schema 并进行各种计算。

接下来,让我们通过运行以下命令将 schema 应用到数据库:

export DB_URL='postgresql://postgres:pass@localhost:5432/postgres?sslmode=disable'
atlas schema apply --env local

Atlas 将从我们的配置中加载数据库的期望状态,将其与数据库的当前状态进行比较,并创建迁移计划以使数据库达到期望状态:

Planning migration statements (5 in total):

-- create extension "vector":
-> CREATE EXTENSION "vector" WITH SCHEMA "public" VERSION "0.8.0";
-- create "chunks" table:
-> CREATE TABLE "public"."chunks" (
"id" bigint NOT NULL GENERATED BY DEFAULT AS IDENTITY,
"path" character varying NOT NULL,
"nchunk" bigint NOT NULL,
"data" text NOT NULL,
PRIMARY KEY ("id")
);
-- create "embeddings" table:
-> CREATE TABLE "public"."embeddings" (
"id" bigint NOT NULL GENERATED BY DEFAULT AS IDENTITY,
"embedding" public.vector(1536) NOT NULL,
"chunk_id" bigint NOT NULL,
PRIMARY KEY ("id"),
CONSTRAINT "embeddings_chunks_embedding" FOREIGN KEY ("chunk_id") REFERENCES "public"."chunks" ("id") ON UPDATE NO ACTION ON DELETE NO ACTION
);
-- create index "embedding_embedding" to table: "embeddings":
-> CREATE INDEX "embedding_embedding" ON "public"."embeddings" USING hnsw ("embedding" vector_l2_ops);
-- create index "embeddings_chunk_id_key" to table: "embeddings":
-> CREATE UNIQUE INDEX "embeddings_chunk_id_key" ON "public"."embeddings" ("chunk_id");

-------------------------------------------

Analyzing planned statements (5 in total):

-- non-optimal columns alignment:
-- L4: Table "chunks" has 8 redundant bytes of padding per row. To reduce disk space,
the optimal order of the columns is as follows: "id", "nchunk", "path",
"data" https://atlasgo.io/lint/analyzers#PG110
-- ok (370.25µs)

-------------------------
-- 114.306667ms
-- 5 schema changes
-- 1 diagnostic

-------------------------------------------

? Approve or abort the plan:
▸ Approve and apply
Abort

除了规划变更之外,Atlas 还会提供诊断和优化 schema 的建议。在这种情况下,它建议重新排列 chunks 表中的列以减少磁盘空间。由于我们在本教程中不关心磁盘空间,我们可以通过选择 Approve and apply 来继续迁移。

最后,我们可以验证 schema 是否成功应用,可以重新运行 atlas schema apply 命令。Atlas 将输出:

Schema is synced, no changes to be made

搭建 CLI 脚手架

现在我们的数据库 schema 已经设置好了,让我们搭建 CLI 应用程序的脚手架。在本教程中,我们将使用 alecthomas/kong 库来构建一个可以加载、索引和查询数据库中文档的小应用程序。

首先,安装 kong 库:

go get github.com/alecthomas/kong

接下来,创建一个名为 cmd/entrag/main.go 的新文件,并按如下方式定义 CLI 应用程序:

cmd/entrag/main.go
package main

import (
"fmt"
"os"

"github.com/alecthomas/kong"
)

// CLI holds global options and subcommands.
type CLI struct {
// DBURL is read from the environment variable DB_URL.
DBURL string `kong:"env='DB_URL',help='Database URL for the application.'"`
OpenAIKey string `kong:"env='OPENAI_KEY',help='OpenAI API key for the application.'"`

// Subcommands
Load *LoadCmd `kong:"cmd,help='Load command that accepts a path.'"`
Index *IndexCmd `kong:"cmd,help='Create embeddings for any chunks that do not have one.'"`
Ask *AskCmd `kong:"cmd,help='Ask a question about the indexed documents'"`
}

func main() {
var cli CLI
app := kong.Parse(&cli,
kong.Name("entrag"),
kong.Description("Ask questions about markdown files."),
kong.UsageOnError(),
)
if err := app.Run(&cli); err != nil {
fmt.Fprintf(os.Stderr, "Error: %s\n", err)
os.Exit(1)
}
}

创建一个名为 cmd/entrag/rag.go 的附加文件,内容如下:

cmd/entrag/rag.go
package main

type (
// LoadCmd loads the markdown files into the database.
LoadCmd struct {
Path string `help:"path to dir with markdown files" type:"existingdir" required:""`
}
// IndexCmd creates the embedding index on the database.
IndexCmd struct {
}
// AskCmd is another leaf command.
AskCmd struct {
// Text is the positional argument for the ask command.
Text string `kong:"arg,required,help='Text for the ask command.'"`
}
)

通过运行以下命令验证我们搭建的 CLI 应用程序是否正常工作:

go run ./cmd/entrag --help

如果一切设置正确,您应该会看到 CLI 应用程序的帮助输出:

Usage: entrag <command> [flags]

Ask questions about markdown files.

Flags:
-h, --help Show context-sensitive help.
--dburl=STRING Database URL for the application ($DB_URL).
--open-ai-key=STRING OpenAI API key for the application ($OPENAI_KEY).

Commands:
load --path=STRING [flags]
Load command that accepts a path.

index [flags]
Create embeddings for any chunks that do not have one.

ask <text> [flags]
Ask a question about the indexed documents

Run "entrag <command> --help" for more information on a command.

将文档加载到数据库

接下来,我们需要一些 markdown 文件加载到数据库中。创建一个名为 data 的目录并添加一些 markdown 文件。在这个示例中,我下载了 ent/ent 仓库,并使用 docs 目录作为 markdown 文件的来源。

现在,让我们实现 LoadCmd 命令将 markdown 文件加载到数据库中。打开 cmd/entrag/rag.go 文件并添加以下代码:

cmd/entrag/rag.go
const (
tokenEncoding = "cl100k_base"
chunkSize = 1000
)

// Run is the method called when the "load" command is executed.
func (cmd *LoadCmd) Run(ctx *CLI) error {
client, err := ctx.entClient()
if err != nil {
return fmt.Errorf("failed opening connection to postgres: %w", err)
}
tokTotal := 0
return filepath.WalkDir(ctx.Load.Path, func(path string, d fs.DirEntry, err error) error {
if filepath.Ext(path) == ".mdx" || filepath.Ext(path) == ".md" {
chunks := breakToChunks(path)
for i, chunk := range chunks {
tokTotal += len(chunk)
client.Chunk.Create().
SetData(chunk).
SetPath(path).
SetNchunk(i).
SaveX(context.Background())
}
}
return nil
})
}

func (c *CLI) entClient() (*ent.Client, error) {
return ent.Open("postgres", c.DBURL)
}

这段代码为 LoadCmd 命令定义了 Run 方法。该方法从指定路径读取 markdown 文件,将它们分成每个 1000 个 token 的块,并将它们保存到数据库。我们使用 entClient 方法使用 CLI 选项中指定的数据库 URL 创建一个新的 Ent 客户端。

有关 breakToChunks 的实现,请参阅 entrag 仓库中的完整代码,它几乎完全基于 Eli Bendersky 的 Go 语言 RAG 入门

最后,让我们运行 load 命令将 markdown 文件加载到数据库中:

go run ./cmd/entrag load --path=data

命令完成后,您应该会看到分块已加载到数据库中。要验证,请运行:

docker exec -it postgres psql -U postgres -d postgres -c "SELECT COUNT(*) FROM chunks;"

您应该会看到类似以下的内容:

  count
-------
276
(1 row)

索引嵌入向量

现在我们已经将文档加载到数据库中,我们需要为每个分块创建嵌入向量。我们将使用 OpenAI API 为分块生成嵌入向量。为此,我们需要安装 openai 包:

go get github.com/sashabaranov/go-openai

如果您没有 OpenAI API 密钥,可以在 OpenAI 平台上注册帐户并生成 API 密钥

我们将从环境变量 OPENAI_KEY 读取此密钥,所以让我们设置它:

export OPENAI_KEY=<your OpenAI API key>

接下来,让我们实现 IndexCmd 命令为分块创建嵌入向量。打开 cmd/entrag/rag.go 文件并添加以下代码:

cmd/entrag/rag.go
// Run is the method called when the "index" command is executed.
func (cmd *IndexCmd) Run(cli *CLI) error {
client, err := cli.entClient()
if err != nil {
return fmt.Errorf("failed opening connection to postgres: %w", err)
}
ctx := context.Background()
chunks := client.Chunk.Query().
Where(
chunk.Not(
chunk.HasEmbedding(),
),
).
Order(ent.Asc(chunk.FieldID)).
AllX(ctx)
for _, ch := range chunks {
log.Println("Created embedding for chunk", ch.Path, ch.Nchunk)
embedding := getEmbedding(ch.Data)
_, err := client.Embedding.Create().
SetEmbedding(pgvector.NewVector(embedding)).
SetChunk(ch).
Save(ctx)
if err != nil {
return fmt.Errorf("error creating embedding: %v", err)
}
}
return nil
}

// getEmbedding invokes the OpenAI embedding API to calculate the embedding
// for the given string. It returns the embedding.
func getEmbedding(data string) []float32 {
client := openai.NewClient(os.Getenv("OPENAI_KEY"))
queryReq := openai.EmbeddingRequest{
Input: []string{data},
Model: openai.AdaEmbeddingV2,
}
queryResponse, err := client.CreateEmbeddings(context.Background(), queryReq)
if err != nil {
log.Fatalf("Error getting embedding: %v", err)
}
return queryResponse.Data[0].Embedding
}

我们为 IndexCmd 命令定义了 Run 方法。该方法查询数据库中没有嵌入向量的分块,使用 OpenAI API 为每个分块生成嵌入向量,并将嵌入向量保存到数据库。

最后,让我们运行 index 命令为分块创建嵌入向量:

go run ./cmd/entrag index

您应该会看到类似以下的日志:

2025/02/13 13:04:42 Created embedding for chunk /Users/home/entr/data/md/aggregate.md 0
2025/02/13 13:04:43 Created embedding for chunk /Users/home/entr/data/md/ci.mdx 0
2025/02/13 13:04:44 Created embedding for chunk /Users/home/entr/data/md/ci.mdx 1
2025/02/13 13:04:45 Created embedding for chunk /Users/home/entr/data/md/ci.mdx 2
2025/02/13 13:04:46 Created embedding for chunk /Users/home/entr/data/md/code-gen.md 0
2025/02/13 13:04:47 Created embedding for chunk /Users/home/entr/data/md/code-gen.md 1

提问

现在我们已经加载了文档并为分块创建了嵌入向量,我们可以实现 AskCmd 命令来询问有关索引文档的问题。打开 cmd/entrag/rag.go 文件并添加以下代码:

cmd/entrag/rag.go
// Run is the method called when the "ask" command is executed.
func (cmd *AskCmd) Run(ctx *CLI) error {
client, err := ctx.entClient()
if err != nil {
return fmt.Errorf("failed opening connection to postgres: %w", err)
}
question := cmd.Text
emb := getEmbedding(question)
embVec := pgvector.NewVector(emb)
embs := client.Embedding.
Query().
Order(func(s *sql.Selector) {
s.OrderExpr(sql.ExprP("embedding <-> $1", embVec))
}).
WithChunk().
Limit(5).
AllX(context.Background())
b := strings.Builder{}
for _, e := range embs {
chnk := e.Edges.Chunk
b.WriteString(fmt.Sprintf("From file: %v\n", chnk.Path))
b.WriteString(chnk.Data)
}
query := fmt.Sprintf(`Use the below information from the ent docs to answer the subsequent question.
Information:
%v

Question: %v`, b.String(), question)
oac := openai.NewClient(ctx.OpenAIKey)
resp, err := oac.CreateChatCompletion(
context.Background(),
openai.ChatCompletionRequest{
Model: openai.GPT4o,
Messages: []openai.ChatCompletionMessage{

{
Role: openai.ChatMessageRoleUser,
Content: query,
},
},
},
)
if err != nil {
return fmt.Errorf("error creating chat completion: %v", err)
}
choice := resp.Choices[0]
out, err := glamour.Render(choice.Message.Content, "dark")
fmt.Print(out)
return nil
}

这就是所有部分组合在一起的地方。在使用文档及其嵌入向量准备好数据库之后,我们现在可以询问有关它们的问题。让我们分解 AskCmd 命令:

emb := getEmbedding(question)
embVec := pgvector.NewVector(emb)
embs := client.Embedding.
Query().
Order(func(s *sql.Selector) {
s.OrderExpr(sql.ExprP("embedding <-> $1", embVec))
}).
WithChunk().
Limit(5).
AllX(context.Background())

我们首先使用 OpenAI API 将用户的问题转换为向量。使用这个向量,我们希望在数据库中找到最相似的嵌入向量。我们查询数据库中的嵌入向量,使用 pgvector<-> 操作符按相似性排序,并将结果限制为前 5 个。

for _, e := range embs {
chnk := e.Edges.Chunk
b.WriteString(fmt.Sprintf("From file: %v\n", chnk.Path))
b.WriteString(chnk.Data)
}
query := fmt.Sprintf(`Use the below information from the ent docs to answer the subsequent question.
Information:
%v

Question: %v`, b.String(), question)

接下来,我们准备前 5 个分块的信息作为问题的上下文。然后我们将问题和上下文格式化为单个字符串。

oac := openai.NewClient(ctx.OpenAIKey)
resp, err := oac.CreateChatCompletion(
context.Background(),
openai.ChatCompletionRequest{
Model: openai.GPT4o,
Messages: []openai.ChatCompletionMessage{

{
Role: openai.ChatMessageRoleUser,
Content: query,
},
},
},
)
if err != nil {
return fmt.Errorf("error creating chat completion: %v", err)
}
choice := resp.Choices[0]
out, err := glamour.Render(choice.Message.Content, "dark")
fmt.Print(out)

然后,我们使用 OpenAI API 生成问题的响应。我们将问题和上下文传递给 API 并接收响应。然后我们使用 glamour 包渲染响应以在终端中显示。

在运行 ask 命令之前,让我们安装 glamour 包:

go get github.com/charmbracelet/glamour

最后,让我们运行 ask 命令来询问有关索引文档的问题:

go run ./cmd/entrag ask "tl;dr What is Ent?"

我们的 RAG 系统响应:

  Ent is an open-source entity framework (ORM) for the Go programming language. It
allows developers to define data models or graph-structures in Go code. Ent
emphasizes principles such as schema as code, a statically typed and explicit
API generated through codegen, simple queries and graph traversals, statically
typed predicates, and storage agnosticism. It supports various databases,
including MySQL, MariaDB, PostgreSQL, SQLite, and Gremlin-based graph databases,
and aims to enhance productivity in Go development.

太棒了!我们已经成功使用 Ent、Atlas 和 pgvector 构建了一个 RAG 系统。 我们现在可以询问有关加载到数据库中的文档的问题,并获得上下文感知的响应。

以下是我们出色的 RAG 系统的更多问答示例:

go run ./cmd/entrag ask "how to define order field in entgql"
To define an order field in entgql , you need to annotate a field in your Ent schema using the entgql.Annotation with the OrderField . Here's a step-by- step guide on how you can do it:
  1. Choose a Comparable Field: Select the field in your schema that you want to be orderable. This could be a text field, a timestamp, an integer, an enum, etc.

  2. Annotate the Field: Use the entgql.OrderField annotation on the chosen field. The order field name should be uppercase and match its corresponding enum value in the GraphQL schema.

  3. Update your Schema: Here’s an example of how to annotate your fields in the ent/schema :

    func (Todo) Fields() []ent.Field {
    return []ent.Field{
    field.Text("text").
    NotEmpty().
    Annotations(
    entgql.OrderField("TEXT"),
    ),
    field.Time("created_at").
    Default(time.Now).
    Immutable().
    Annotations(
    entgql.OrderField("CREATED_AT"),
    ),
    field.Enum("status").
    NamedValues(
    "InProgress", "IN_PROGRESS",
    "Completed", "COMPLETED",
    ).
    Default("IN_PROGRESS").
    Annotations(
    entgql.OrderField("STATUS"),
    ),
    field.Int("priority").
    Default(0).
    Annotations(
    entgql.OrderField("PRIORITY"),
    ),
    }
    }
  4. Alternatively, Multiple Order Fields: If you want to enable ordering by multiple fields, you can use the entgql.MultiOrder() annotation:

    func (Todo) Annotations() []schema.Annotation {
    return []schema.Annotation{
    entgql.MultiOrder(),
    }
    }
  5. Generate GraphQL Types: Ensure that the GraphQL types match this setup in your GraphQL schema, for example:

    enum OrderDirection {
    ASC
    DESC
    }
    enum TodoOrderField {
    CREATED_AT
    PRIORITY
    STATUS
    TEXT
    }
    input TodoOrder {
    direction: OrderDirection!
    field: TodoOrderField
    }
  6. Add orderBy Argument to Queries: Include the orderBy parameter in your GraphQL queries to allow clients to sort items:

    type Query {
    todos(
    after: Cursor
    first: Int
    before: Cursor
    last: Int
    orderBy: TodoOrder
    ): TodoConnection!
    }

    By following these steps, you ensure that your Ent-based application can support sorting in your GraphQL API based on various fields.

go run ./cmd/entrag ask "what's the difference between privacy rules and interceptors"
Privacy rules and interceptors serve different purposes within the Ent framework, each providing distinct functionalities:
  1. Privacy Rules:
  • Purpose: Privacy rules are primarily concerned with enforcing access control policies for data queries and mutations. They determine whether an operation is allowed or denied based on predefined rules.
  • Implementation: They are implemented as part of a privacy policy using the ent.Policy interface which includes EvalQuery and EvalMutation methods.
  • Operation: Privacy rules evaluate whether specific conditions are met before allowing or denying access to the data. They can return decisions like privacy.Allow , privacy.Deny , or privacy.Skip to control the flow of evaluation.
  • Use Case: Ideal for managing access control by ensuring that users can only perform certain operations if they meet the specified criteria.
  1. Interceptors:
  • Purpose: Interceptors act as middleware for Ent queries, allowing modification and customization of query behaviors. They can be used to augment or modify queries during different stages of their lifecycle.
  • Implementation: Implemented as interfaces or using the ent.InterceptFunc adapter. They intercept and potentially modify queries by working on the read-path.
  • Operation: Interceptors modify or enhance queries, typically without the access control logic inherent in privacy rules. They provide hooks to execute custom logic pre and post query execution.
  • Use Case: Suitable for generic transformations or modifications to queries, such as adding default filters, query limitations, or logging operations without focusing on access control.

In summary, while privacy rules focus on access control, interceptors are about managing and modifying the query execution process.

总结

在这篇博客文章中,我们探索了如何使用 Ent、Atlas 和 pgvector 构建 RAG 系统。特别感谢 Eli Bendersky 提供的信息丰富的博客文章以及他多年来出色的 Go 语言写作!

· 阅读需 4 分钟

简而言之

使用一条命令即可创建 Ent schema 的可视化图:

atlas schema inspect \
-u ent://ent/schema \
--dev-url "sqlite://demo?mode=memory&_fk=1" \
--visualize

大家好!

几个月前,我们分享了 entviz,这是一个很酷的工具,可以让你可视化 Ent schema。由于它的成功和受欢迎程度,我们决定将其直接集成到 Atlas 中,Atlas 是 Ent 使用的迁移引擎。

自 Atlas v0.13.0 版本发布以来,你现在可以直接从 Atlas 可视化你的 Ent schema,而无需安装额外的工具。

私有可视化 vs. 公开可视化

以前,你只能将 schema 的可视化分享到 Atlas 公共 Playground。虽然这对于与他人分享你的 schema 很方便,但对于许多维护敏感 schema 且不能公开分享的团队来说,这是不可接受的。

在这个新版本中,你可以轻松地将 schema 直接发布到你在 Atlas Cloud 上的私有工作区。这意味着只有你和你的团队才能访问你的 schema 可视化图。

使用 Atlas 可视化你的 Ent Schema

要使用 Atlas 可视化你的 Ent schema,首先安装最新版本:

curl -sSfL https://atlasgo.io/install.sh | sh

有关其他安装选项,请参阅 Atlas 安装文档

接下来,运行以下命令生成 Ent schema 的可视化图:

atlas schema inspect \
-u ent://ent/schema \
--dev-url "sqlite://demo?mode=memory&_fk=1" \
--visualize

让我们分解一下这个命令:

  • atlas schema inspect - 此命令可用于从各种来源检查 schema 并以各种格式输出。在这种情况下,我们使用它来检查 Ent schema。
  • -u ent://ent/schema - 这是我们要检查的 Ent schema 的 URL。在这种情况下,我们使用 ent:// schema 加载器指向 ./ent/schema 目录中的本地 Ent schema。
  • --dev-url "sqlite://demo?mode=memory&_fk=1" - Atlas 依赖于一个称为 Dev Database 的空数据库来规范化 schema 并进行各种计算。在这种情况下,我们使用内存中的 SQLite 数据库;但是,如果你使用不同的驱动程序,可以使用 docker://mysql/8/dev(用于 MySQL)或 docker://postgres/15/?search_path=public(用于 PostgreSQL)。

运行此命令后,你应该会看到以下输出:

Use the arrow keys to navigate: ↓ ↑ → ←
? Where would you like to share your schema visualization?:
▸ Publicly (gh.atlasgo.cloud)
Your personal workspace (requires 'atlas login')

如果你想公开分享你的 schema,可以选择第一个选项。如果你想私下分享,可以选择第二个选项,然后运行 atlas login 登录到你的(免费)Atlas 账户。

总结

在这篇文章中,我们展示了如何使用 Atlas 轻松可视化你的 Ent schema。我们希望你觉得这个功能有用,期待听到你的反馈!

获取更多 Ent 新闻和更新:

· 阅读需 25 分钟

Ent 是一个开源的 Go 实体框架。它与更传统的 ORM 类似,但具有一些独特的功能,使其在 Go 社区中非常流行。Ent 最初由 Ariel 于 2019 年在 Facebook 工作时开源。Ent 源于管理具有非常大且复杂数据模型的应用程序开发过程中的痛点,并在开源之前在 Facebook 内部成功运行了一年。在从 Facebook 开源项目毕业后,Ent 于 2021 年 9 月加入了 Linux 基金会。

本教程面向想要从构建简单项目开始的 Ent 和 Go 新手:一个非常简单的内容管理系统。

在过去几年中,Ent 已成为 Go 中增长最快的 ORM 之一:

来源:@ossinsight_bot on Twitter,2022 年 11 月

Ent 最常被提及的功能有:

  • 用于操作数据库的类型安全 Go API。 忘记使用 interface{} 或反射来操作数据库吧。使用你的编辑器能理解、编译器能强制执行的纯 Go 代码。

  • 使用图语义建模数据 - Ent 使用图语义来建模应用程序的数据。这使得通过简单的 API 遍历复杂数据集变得非常容易。

    假设我们想获取所有在关于狗的群组中的用户。以下是使用 Ent 编写类似代码的两种方式:

    // Start traversing from the topic.
    client.Topic.Query().
    Where(topic.Name("dogs")).
    QueryGroups().
    QueryUsers().
    All(ctx)

    // OR: Start traversing from the users and filter.
    client.User.Query().
    Where(
    user.HasGroupsWith(
    group.HasTopicsWith(
    topic.Name("dogs"),
    ),
    ),
    ).
    All(ctx)
  • 自动生成服务器 - 无论你需要 GraphQL、gRPC 还是符合 OpenAPI 的 API 层,Ent 都可以生成在数据库之上创建高性能服务器所需的代码。Ent 将生成第三方模式(GraphQL 类型、Protobuf 消息等)以及用于从数据库读取和写入的重复任务的优化代码。
  • 与 Atlas 捆绑 - Ent 与 Atlas 深度集成,这是一个具有许多高级功能的强大模式管理工具。Atlas 可以自动为你规划模式迁移,也可以在 CI 中验证它们或为你部署到生产环境。(声明:Ariel 和我是创建者和维护者)

前置条件

配套仓库

你可以在这个仓库中找到本教程中展示的所有代码。

步骤 1:设置数据库模式

你可以在这个提交中找到本步骤描述的代码。

让我们首先使用 go mod init 初始化项目:

go mod init github.com/rotemtam/ent-blog-example

Go 确认我们的新模块已创建:

go: creating new go.mod: module github.com/rotemtam/ent-blog-example

在我们的演示项目中,首先要处理的是设置数据库。我们使用 Ent 创建应用程序数据模型。让我们使用 go get 获取它:

go get -u entgo.io/ent@master

安装完成后,我们可以使用 Ent CLI 初始化本教程中将要处理的两种实体类型的模型:UserPost

go run -mod=mod entgo.io/ent/cmd/ent new User Post

注意创建了几个文件:

.
`-- ent
|-- generate.go
`-- schema
|-- post.go
`-- user.go

2 directories, 3 files

Ent 为我们的项目创建了基本结构:

  • generate.go - 稍后我们将看到如何使用此文件来调用 Ent 的代码生成引擎。
  • schema 目录,包含我们请求的每个实体的基础 ent.Schema

让我们继续为我们的实体定义模式。这是 User 的模式定义:

// Fields of the User.  
func (User) Fields() []ent.Field {
return []ent.Field{
field.String("name"),
field.String("email").
Unique(),
field.Time("created_at").
Default(time.Now),
}
}

// Edges of the User.
func (User) Edges() []ent.Edge {
return []ent.Edge{
edge.To("posts", Post.Type),
}
}

Observe that we defined three fields, name, email and created_at (which takes the default value of time.Now()). Since we expect emails to be unique in our system we added that constraint on the email field. In addition, we defined an edge named posts to the Post type. Edges are used in Ent to define relationships between entities. When working with a relational database, edges are translated into foreign keys and association tables.

注意我们定义了三个字段:nameemailcreated_at(默认值为 time.Now())。由于我们期望邮箱在系统中是唯一的,所以在 email 字段上添加了该约束。此外,我们定义了一个名为 posts 的边,指向 Post 类型。在 Ent 中,边用于定义实体之间的关系。在使用关系型数据库时,边会被转换为外键和关联表。

// Post holds the schema definition for the Post entity.
type Post struct {
ent.Schema
}

// Fields of the Post.
func (Post) Fields() []ent.Field {
return []ent.Field{
field.String("title"),
field.Text("body"),
field.Time("created_at").
Default(time.Now),
}
}

// Edges of the Post.
func (Post) Edges() []ent.Edge {
return []ent.Edge{
edge.From("author", User.Type).
Unique().
Ref("posts"),
}
}

Post 模式上,我们同样定义了三个字段:titlebodycreated_at。此外,我们定义了一个从 PostUser 实体的名为 author 的边。我们将这条边标记为 Unique,因为在我们初步的系统中,每篇文章只能有一个作者。我们使用 Ref 来告诉 Ent 这条边的反向引用是 User 上的 posts 边。

Ent 的强大之处在于它的代码生成引擎。在使用 Ent 开发时,每当我们对应用程序模式进行任何更改,都必须调用 Ent 的代码生成引擎来重新生成我们的数据库访问代码。这就是 Ent 能够为我们维护类型安全且高效的 Go API 的原因。

让我们看看实际效果,运行:

go generate ./...

观察到为我们创建了很多新的 Go 文件:

.
`-- ent
|-- client.go
|-- context.go
|-- ent.go
|-- enttest
| `-- enttest.go
/// .. 为简洁起见省略部分内容
|-- user_query.go
`-- user_update.go

9 directories, 29 files
信息

如果你想查看我们应用程序的实际数据库模式是什么样子的,可以使用一个名为 entviz 的实用工具:

go run -mod=mod ariga.io/entviz ./ent/schema

要查看结果,点击这里

定义好数据模型后,让我们为它创建数据库模式。

要安装 Atlas 的最新版本,只需在终端中运行以下命令之一,或查看 Atlas 网站

curl -sSf https://atlasgo.sh | sh

With Atlas installed, we can create the initial migration script:

安装 Atlas 后,我们可以创建初始迁移脚本:

atlas migrate diff add_users_posts \
--dir "file://ent/migrate/migrations" \
--to "ent://ent/schema" \
--dev-url "docker://mysql/8/ent"

观察到创建了两个新文件:

ent/migrate/migrations
|-- 20230226150934_add_users_posts.sql
`-- atlas.sum

SQL 文件(实际文件名会根据你运行 atlas migrate diff 时的时间戳而有所不同)包含在空 MySQL 数据库上设置数据库模式所需的 SQL DDL 语句:

-- create "users" table  
CREATE TABLE `users` (`id` bigint NOT NULL AUTO_INCREMENT, `name` varchar(255) NOT NULL, `email` varchar(255) NOT NULL, `created_at` timestamp NOT NULL, PRIMARY KEY (`id`), UNIQUE INDEX `email` (`email`)) CHARSET utf8mb4 COLLATE utf8mb4_bin;
-- create "posts" table
CREATE TABLE `posts` (`id` bigint NOT NULL AUTO_INCREMENT, `title` varchar(255) NOT NULL, `body` longtext NOT NULL, `created_at` timestamp NOT NULL, `user_posts` bigint NULL, PRIMARY KEY (`id`), INDEX `posts_users_posts` (`user_posts`), CONSTRAINT `posts_users_posts` FOREIGN KEY (`user_posts`) REFERENCES `users` (`id`) ON UPDATE NO ACTION ON DELETE SET NULL) CHARSET utf8mb4 COLLATE utf8mb4_bin;

要设置我们的开发环境,让我们使用 Docker 运行一个本地 mysql 容器:

docker run --rm --name entdb -d -p 3306:3306 -e MYSQL_DATABASE=ent -e MYSQL_ROOT_PASSWORD=pass mysql:8

最后,让我们在本地数据库上运行迁移脚本:

atlas migrate apply --dir file://ent/migrate/migrations \
--url mysql://root:pass@localhost:3306/ent

Atlas 报告它成功创建了表:

Migrating to version 20230220115943 (1 migrations in total):

-- migrating version 20230220115943
-> CREATE TABLE `users` (`id` bigint NOT NULL AUTO_INCREMENT, `name` varchar(255) NOT NULL, `email` varchar(255) NOT NULL, `created_at` timestamp NOT NULL, PRIMARY KEY (`id`), UNIQUE INDEX `email` (`email`)) CHARSET utf8mb4 COLLATE utf8mb4_bin;
-> CREATE TABLE `posts` (`id` bigint NOT NULL AUTO_INCREMENT, `title` varchar(255) NOT NULL, `body` longtext NOT NULL, `created_at` timestamp NOT NULL, `post_author` bigint NULL, PRIMARY KEY (`id`), INDEX `posts_users_author` (`post_author`), CONSTRAINT `posts_users_author` FOREIGN KEY (`post_author`) REFERENCES `users` (`id`) ON UPDATE NO ACTION ON DELETE SET NULL) CHARSET utf8mb4 COLLATE utf8mb4_bin;
-- ok (55.972329ms)

-------------------------
-- 67.18167ms
-- 1 migrations
-- 2 sql statements

步骤 2:填充数据库

信息

本步骤的代码可以在这个提交中找到。

在我们开发内容管理系统时,如果加载一个没有内容的网页会很无聊。让我们从向数据库填充数据开始,并学习一些 Ent 概念。

要访问我们的本地 MySQL 数据库,我们需要一个驱动程序,使用 go get 获取它:

go get -u github.com/go-sql-driver/mysql

创建一个名为 main.go 的文件,并添加这个基本的填充脚本。

package main

import (
"context"
"flag"
"fmt"
"log"

"github.com/rotemtam/ent-blog-example/ent"

_ "github.com/go-sql-driver/mysql"
"github.com/rotemtam/ent-blog-example/ent/user"
)

func main() {
// Read the connection string to the database from a CLI flag.
var dsn string
flag.StringVar(&dsn, "dsn", "", "database DSN")
flag.Parse()

// Instantiate the Ent client.
client, err := ent.Open("mysql", dsn)
if err != nil {
log.Fatalf("failed connecting to mysql: %v", err)
}
defer client.Close()

ctx := context.Background()
// If we don't have any posts yet, seed the database.
if !client.Post.Query().ExistX(ctx) {
if err := seed(ctx, client); err != nil {
log.Fatalf("failed seeding the database: %v", err)
}
}
// ... Continue with server start.
}

func seed(ctx context.Context, client *ent.Client) error {
// Check if the user "rotemtam" already exists.
r, err := client.User.Query().
Where(
user.Name("rotemtam"),
).
Only(ctx)
switch {
// If not, create the user.
case ent.IsNotFound(err):
r, err = client.User.Create().
SetName("rotemtam").
SetEmail("r@hello.world").
Save(ctx)
if err != nil {
return fmt.Errorf("failed creating user: %v", err)
}
case err != nil:
return fmt.Errorf("failed querying user: %v", err)
}
// Finally, create a "Hello, world" blogpost.
return client.Post.Create().
SetTitle("Hello, World!").
SetBody("This is my first post").
SetAuthor(r).
Exec(ctx)
}

如你所见,这个程序首先检查数据库中是否存在任何 Post 实体,如果不存在则调用 seed 函数。这个函数使用 Ent 从数据库中检索名为 rotemtam 的用户,如果不存在则尝试创建它。最后,该函数创建一篇以该用户为作者的博客文章。

运行它:

 go run main.go -dsn "root:pass@tcp(localhost:3306)/ent?parseTime=true"

步骤 3:创建首页

信息

本步骤描述的代码可以在这个提交中找到

现在让我们创建博客的首页。这将由几个部分组成:

  1. 视图 - 这是一个 Go html/template,用于渲染用户将看到的实际 HTML。
  2. 服务器代码 - 包含 HTTP 请求处理程序,用户的浏览器将与之通信,并使用从数据库检索的数据渲染我们的模板。
  3. 路由器 - 将不同的路径注册到处理程序。
  4. 单元测试 - 验证我们的服务器行为是否正确。

视图

Go 有一个出色的模板引擎,有两种风格:text/template 用于渲染通用文本,html/template 具有一些额外的安全功能,可以在处理 HTML 文档时防止代码注入。在这里阅读更多相关信息。

让我们创建第一个模板,用于显示博客文章列表。创建一个名为 templates/list.tmpl 的新文件:

<html>
<head>
<title>My Blog</title>
<link href="https://cdn.jsdelivr.net/npm/bootstrap@5.3.0-alpha1/dist/css/bootstrap.min.css" rel="stylesheet"
integrity="sha384-GLhlTQ8iRABdZLl6O3oVMWSktQOp6b7In1Zl3/Jr59b6EGGoI1aFkw7cmDA6j6gD" crossorigin="anonymous">

</head>
<body>
<div class="col-lg-8 mx-auto p-4 py-md-5">
<header class="d-flex align-items-center pb-3 mb-5 border-bottom">
<a href="/" class="d-flex align-items-center text-dark text-decoration-none">
<span class="fs-4">Ent Blog Demo</span>
</a>
</header>

<main>
<div class="row g-5">
<div class="col-md-12">
{{- range . }}
<h2>{{ .Title }}</h2>
<p>
{{ .CreatedAt.Format "2006-01-02" }} by {{ .Edges.Author.Name }}
</p>
<p>
{{ .Body }}
</p>
{{- end }}
</div>

</div>
</main>
<footer class="pt-5 my-5 text-muted border-top">
<p>
This is the Ent Blog Demo. It is a simple blog application built with Ent and Go. Get started:
</p>
<pre>go get entgo.io/ent</pre>
</footer>
</div>

<script src="https://cdn.jsdelivr.net/npm/bootstrap@5.3.0-alpha1/dist/js/bootstrap.bundle.min.js"
integrity="sha384-w76AqPfDkMBDXo30jS1Sgez6pr3x5MlQ1ZAGC+nuZB+EYdgRZgiwxhTBTkF7CXvN"
crossorigin="anonymous"></script>
</body>
</html>

这里我们使用了 Bootstrap Starter Template 的修改版本作为 UI 的基础。让我们突出重点部分。如下所示,在我们的 index 处理程序中,我们将向这个模板传递一个 Post 对象切片。

在 Go 模板中,我们作为数据传递给它的任何内容都可以用"."访问,这解释了这一行,我们使用 range 来遍历每篇文章:

{{- range . }}

接下来,我们通过 Author 边打印标题、创建时间和作者名称:

<h2>{{ .Title }}</h2>
<p>
{{ .CreatedAt.Format "2006-01-02" }} by {{ .Edges.Author.Name }}
</p>

最后,我们打印文章正文并关闭循环。

    <p>
{{ .Body }}
</p>
{{- end }}

定义模板后,我们需要让程序可以访问它。我们使用 embed 包将此模板嵌入到二进制文件中(文档):

var (  
//go:embed templates/*
resources embed.FS
tmpl = template.Must(template.ParseFS(resources, "templates/*"))
)

服务器代码

我们继续定义一个名为 server 的类型及其构造函数 newServer。这个结构体将为我们创建的每个 HTTP 处理程序提供接收器方法,并将我们在初始化时创建的 Ent 客户端绑定到服务器代码。

type server struct {
client *ent.Client
}

func newServer(client *ent.Client) *server {
return &server{client: client}
}

接下来,让我们定义博客首页的处理程序。这个页面应该包含所有可用博客文章的列表:

// index serves the blog home page
func (s *server) index(w http.ResponseWriter, r *http.Request) {
posts, err := s.client.Post.
Query().
WithAuthor().
All(r.Context())
if err != nil {
http.Error(w, err.Error(), http.StatusInternalServerError)
return
}
if err := tmpl.Execute(w, posts); err != nil {
http.Error(w, err.Error(), http.StatusInternalServerError)
}
}

让我们放大这里用于从数据库检索文章的 Ent 代码:

// s.client.Post contains methods for interacting with Post entities
// s.client.Post 包含与 Post 实体交互的方法
s.client.Post.
// Begin a query.
// 开始查询。
Query().
// Retrieve the entities using the `Author` edge. (a `User` instance)
// 使用 `Author` 边检索实体。(一个 `User` 实例)
WithAuthor().
// Run the query against the database using the request context.
// 使用请求上下文对数据库运行查询。
All(r.Context())

路由器

要管理应用程序的路由,让我们使用 go-chi,一个流行的 Go 路由库。

go get -u github.com/go-chi/chi/v5

我们定义 newRouter 函数来设置路由器:

// newRouter creates a new router with the blog handlers mounted.
func newRouter(srv *server) chi.Router {
r := chi.NewRouter()
r.Use(middleware.Logger)
r.Use(middleware.Recoverer)
r.Get("/", srv.index)
return r
}

在这个函数中,我们首先实例化一个新的 chi.Router,然后注册两个中间件:

  • middleware.Logger 是一个基本的访问日志记录器,在服务器处理的每个请求上打印一些信息。
  • middleware.Recoverer 在处理程序发生 panic 时恢复,防止因应用程序错误导致整个服务器崩溃的情况。

最后,我们将 server 结构体的 index 函数注册为处理服务器 / 路径的 GET 请求。

单元测试

在将所有内容连接在一起之前,让我们编写一个简单的单元测试来检查我们的代码是否按预期工作。

为了简化测试,我们将安装 Go 的 SQLite 驱动程序,它允许我们使用内存数据库:

go get -u github.com/mattn/go-sqlite3

接下来,我们安装 testify,一个常用于在测试中编写断言的实用程序库。

go get github.com/stretchr/testify 

安装这些依赖项后,创建一个名为 main_test.go 的新文件:

package main

import (
"context"
"io"
"net/http"
"net/http/httptest"
"testing"

_ "github.com/mattn/go-sqlite3"
"github.com/rotemtam/ent-blog-example/ent/enttest"
"github.com/stretchr/testify/require"
)

func TestIndex(t *testing.T) {
// Initialize an Ent client that uses an in memory SQLite db.
client := enttest.Open(t, "sqlite3", "file:ent?mode=memory&cache=shared&_fk=1")
defer client.Close()

// seed the database with our "Hello, world" post and user.
err := seed(context.Background(), client)
require.NoError(t, err)

// Initialize a server and router.
srv := newServer(client)
r := newRouter(srv)

// Create a test server using the `httptest` package.
ts := httptest.NewServer(r)
defer ts.Close()

// Make a GET request to the server root path.
resp, err := ts.Client().Get(ts.URL)

// Assert we get a 200 OK status code.
require.NoError(t, err)
require.Equal(t, http.StatusOK, resp.StatusCode)

// Read the response body and assert it contains "Hello, world!"
body, err := io.ReadAll(resp.Body)
require.NoError(t, err)
require.Contains(t, string(body), "Hello, World!")
}

运行测试以验证我们的服务器是否正常工作:

go test ./...

观察我们的测试通过了:

ok      github.com/rotemtam/ent-blog-example    0.719s
? github.com/rotemtam/ent-blog-example/ent [no test files]
? github.com/rotemtam/ent-blog-example/ent/enttest [no test files]
? github.com/rotemtam/ent-blog-example/ent/hook [no test files]
? github.com/rotemtam/ent-blog-example/ent/migrate [no test files]
? github.com/rotemtam/ent-blog-example/ent/post [no test files]
? github.com/rotemtam/ent-blog-example/ent/predicate [no test files]
? github.com/rotemtam/ent-blog-example/ent/runtime [no test files]
? github.com/rotemtam/ent-blog-example/ent/schema [no test files]
? github.com/rotemtam/ent-blog-example/ent/user [no test files]

将所有内容整合在一起

最后,让我们更新 main 函数以将所有内容整合在一起:

func main() {  
// Read the connection string to the database from a CLI flag.
var dsn string
flag.StringVar(&dsn, "dsn", "", "database DSN")
flag.Parse()

// Instantiate the Ent client.
client, err := ent.Open("mysql", dsn)
if err != nil {
log.Fatalf("failed connecting to mysql: %v", err)
}
defer client.Close()

ctx := context.Background()
// If we don't have any posts yet, seed the database.
if !client.Post.Query().ExistX(ctx) {
if err := seed(ctx, client); err != nil {
log.Fatalf("failed seeding the database: %v", err)
}
}
srv := newServer(client)
r := newRouter(srv)
log.Fatal(http.ListenAndServe(":8080", r))
}

现在我们可以运行应用程序,惊叹于我们的成就:一个可工作的博客首页!

 go run main.go -dsn "root:pass@tcp(localhost:3306)/test?parseTime=true"

步骤 4:添加内容

信息

你可以在这个提交中跟踪本步骤的更改。

没有管理内容能力的内容管理系统是不完整的。让我们演示如何添加在博客上发布新文章的支持。

让我们从创建后端处理程序开始:

// add creates a new blog post.
func (s *server) add(w http.ResponseWriter, r *http.Request) {
author, err := s.client.User.Query().Only(r.Context())
if err != nil {
http.Error(w, err.Error(), http.StatusInternalServerError)
return
}
if err := s.client.Post.Create().
SetTitle(r.FormValue("title")).
SetBody(r.FormValue("body")).
SetAuthor(author).
Exec(r.Context()); err != nil {
http.Error(w, err.Error(), http.StatusInternalServerError)
}
http.Redirect(w, r, "/", http.StatusFound)
}

如你所见,处理程序目前从 users 表加载唯一的用户(因为我们尚未创建用户管理系统或登录功能)。除非从数据库中恰好检索到一个结果,否则 Only 会失败。

接下来,我们的处理程序通过将标题和正文字段设置为从 r.FormValue 检索的值来创建新文章。这是 Go 存储传递给 HTTP 请求的所有表单输入的地方。

创建处理程序后,我们应该将其连接到路由器:

// newRouter creates a new router with the blog handlers mounted.
func newRouter(srv *server) chi.Router {
r := chi.NewRouter()
r.Use(middleware.Logger)
r.Use(middleware.Recoverer)
r.Get("/", srv.index)
r.Post("/add", srv.add)
return r
}

接下来,我们可以添加一个 HTML <form> 组件,供用户编写内容:

<div class="col-md-12">
<hr/>
<h2>Create a new post</h2>
<form action="/add" method="post">
<div class="mb-3">
<label for="title" class="form-label">Title</label>
<input name="title" type="text" class="form-control" id="title" placeholder="Once upon a time..">
</div>
<div class="mb-3">
<label for="body" class="form-label">Body</label>
<textarea name="body" class="form-control" id="body" rows="8"></textarea>
</div>
<div class="mb-3">
<button type="submit" class="btn btn-primary mb-3">Post</button>
</div>
</form>
</div>

另外,让我们添加一个很好的功能,按从最新到最旧的顺序显示博客文章。为此,修改 index 处理程序,使用 created_at 列按降序排列文章:

posts, err := s.client.Post.
Query().
WithAuthor().
Order(ent.Desc(post.FieldCreatedAt)).
All(ctx)

最后,让我们添加另一个单元测试来验证添加文章的流程是否按预期工作:

func TestAdd(t *testing.T) {
client := enttest.Open(t, "sqlite3", "file:ent?mode=memory&cache=shared&_fk=1")
defer client.Close()
err := seed(context.Background(), client)
require.NoError(t, err)

srv := newServer(client)
r := newRouter(srv)

ts := httptest.NewServer(r)
defer ts.Close()

// Post the form.
resp, err := ts.Client().PostForm(ts.URL+"/add", map[string][]string{
"title": {"Testing, one, two."},
"body": {"This is a test"},
})
require.NoError(t, err)
// We should be redirected to the index page and receive 200 OK.
require.Equal(t, http.StatusOK, resp.StatusCode)

body, err := io.ReadAll(resp.Body)
require.NoError(t, err)

// The home page should contain our new post.
require.Contains(t, string(body), "This is a test")
}

让我们运行测试:

go test ./...

一切正常!

ok      github.com/rotemtam/ent-blog-example    0.493s
? github.com/rotemtam/ent-blog-example/ent [no test files]
? github.com/rotemtam/ent-blog-example/ent/enttest [no test files]
? github.com/rotemtam/ent-blog-example/ent/hook [no test files]
? github.com/rotemtam/ent-blog-example/ent/migrate [no test files]
? github.com/rotemtam/ent-blog-example/ent/post [no test files]
? github.com/rotemtam/ent-blog-example/ent/predicate [no test files]
? github.com/rotemtam/ent-blog-example/ent/runtime [no test files]
? github.com/rotemtam/ent-blog-example/ent/schema [no test files]
? github.com/rotemtam/ent-blog-example/ent/user [no test files]

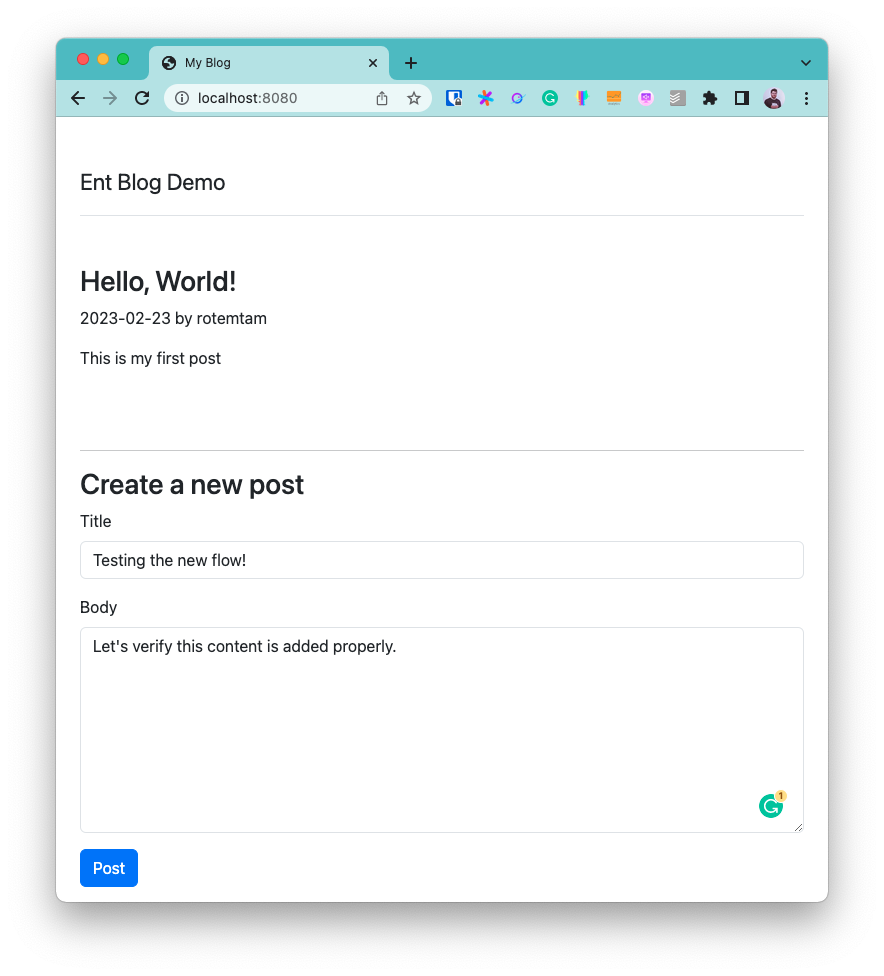
单元测试通过很好,但让我们直观地验证我们的更改:

我们的表单出现了 - 太棒了!提交后:

我们的新文章已显示。干得好!

总结

在这篇文章中,我们演示了如何使用 Ent 和 Go 构建一个简单的 Web 应用程序。我们的应用程序确实很简陋,但它涵盖了构建应用程序时需要处理的许多基础内容:定义数据模型、管理数据库模式、编写服务器代码、定义路由和构建 UI。

正如入门内容通常的情况一样,我们只触及了 Ent 能做的事情的冰山一角,但我希望你对它的一些核心功能有所了解。

获取更多 Ent 新闻和更新:

· 阅读需 4 分钟

摘要

要获取 Ent 模式可视化的公开链接,请运行:

go run -mod=mod ariga.io/entviz ./path/to/ent/schema 

可视化 Ent 模式

Ent 使开发人员能够使用图语义构建复杂的应用程序数据模型:与定义表、列、关联表和外键不同,Ent 模型只需简单地通过节点来定义:

package schema

import (
"entgo.io/ent"
"entgo.io/ent/schema/edge"
)

// User schema.
type User struct {
ent.Schema
}

// Fields of the user.
func (User) Fields() []ent.Field {
return []ent.Field{
// ...
}
}

// Edges of the user.
func (User) Edges() []ent.Edge {
return []ent.Edge{
edge.To("pets", Pet.Type),
}
}

以这种方式建模数据有很多好处,例如能够通过直观的 API 轻松遍历应用程序的数据图,自动生成 GraphQL 服务器等等。

虽然 Ent 可以使用图数据库作为其存储层,但大多数 Ent 用户在其应用程序中使用常见的关系数据库,如 MySQL、PostgreSQL 或 MariaDB。在这些用例中,开发人员经常会思考,Ent 会根据我的应用程序模式创建什么样的实际数据库模式?

无论你是学习创建 Ent 模式基础知识的新 Ent 用户,还是处理优化结果数据库模式以提高性能的专家,能够轻松可视化你的 Ent 模式所对应的数据库模式都非常有用。

介绍新版 entviz

一年半前,我们分享了一个名为 entviz 的 Ent 扩展,该扩展使用户能够生成包含描述应用程序 Ent 模式的实体关系图的简单本地 HTML 文档。

今天,我们很高兴分享一个由 Pedro Henrique (crossworth) 创建的同名超酷工具,它以全新的方式解决了同样的问题。使用(新版)entviz,你只需运行一个简单的 Go 命令:

go run -mod=mod ariga.io/entviz ./path/to/ent/schema 

该工具将分析你的 Ent 模式,并在 Atlas Playground 上创建可视化效果,并为你创建一个可共享的公开链接

Here is a public link to your schema visualization:
https://gh.atlasgo.cloud/explore/saved/60129542154

在这个链接中,你可以以 ERD 的形式直观地查看你的模式,或者以 SQL 或 Atlas HCL 文档的形式以文本方式查看。

总结

在这篇博文中,我们讨论了一些场景,在这些场景中你可能会发现快速获取 Ent 应用程序模式的可视化非常有用,然后我们展示了如何使用 entviz 创建此类可视化。如果你喜欢这个想法,我们非常希望你今天就尝试一下并给我们反馈!

获取更多 Ent 新闻和更新:

· 阅读需 10 分钟

乍一看,更改数据库模式中列的类型似乎是一件微不足道的事情,但实际上这是一个有风险的操作, 可能会导致服务器和数据库之间的兼容性问题。在这篇博文中, 我将探讨开发人员如何在不导致应用程序停机的情况下执行此类更改。

最近,在为 Ariga Cloud 开发一个功能时, 我需要将 Ent 字段的类型从非结构化的 blob 更改为结构化的 JSON 字段。 更改列类型是必要的,以便使用 JSON 谓词 来实现更高效的查询。

原始模式在我们云产品的模式可视化图表中如下所示:

tutorial image 1

在我们的案例中,我们不能简单地将数据复制到新列,因为数据与新列类型不兼容 (blob 数据可能无法转换为 JSON)。

在过去,停止服务器、将数据库模式迁移到下一个版本, 然后才启动与新数据库模式兼容的新版本服务器是可以接受的做法。 如今,业务需求通常要求应用程序必须提供更高的可用性,这给工程团队 带来了零停机执行此类更改的挑战。

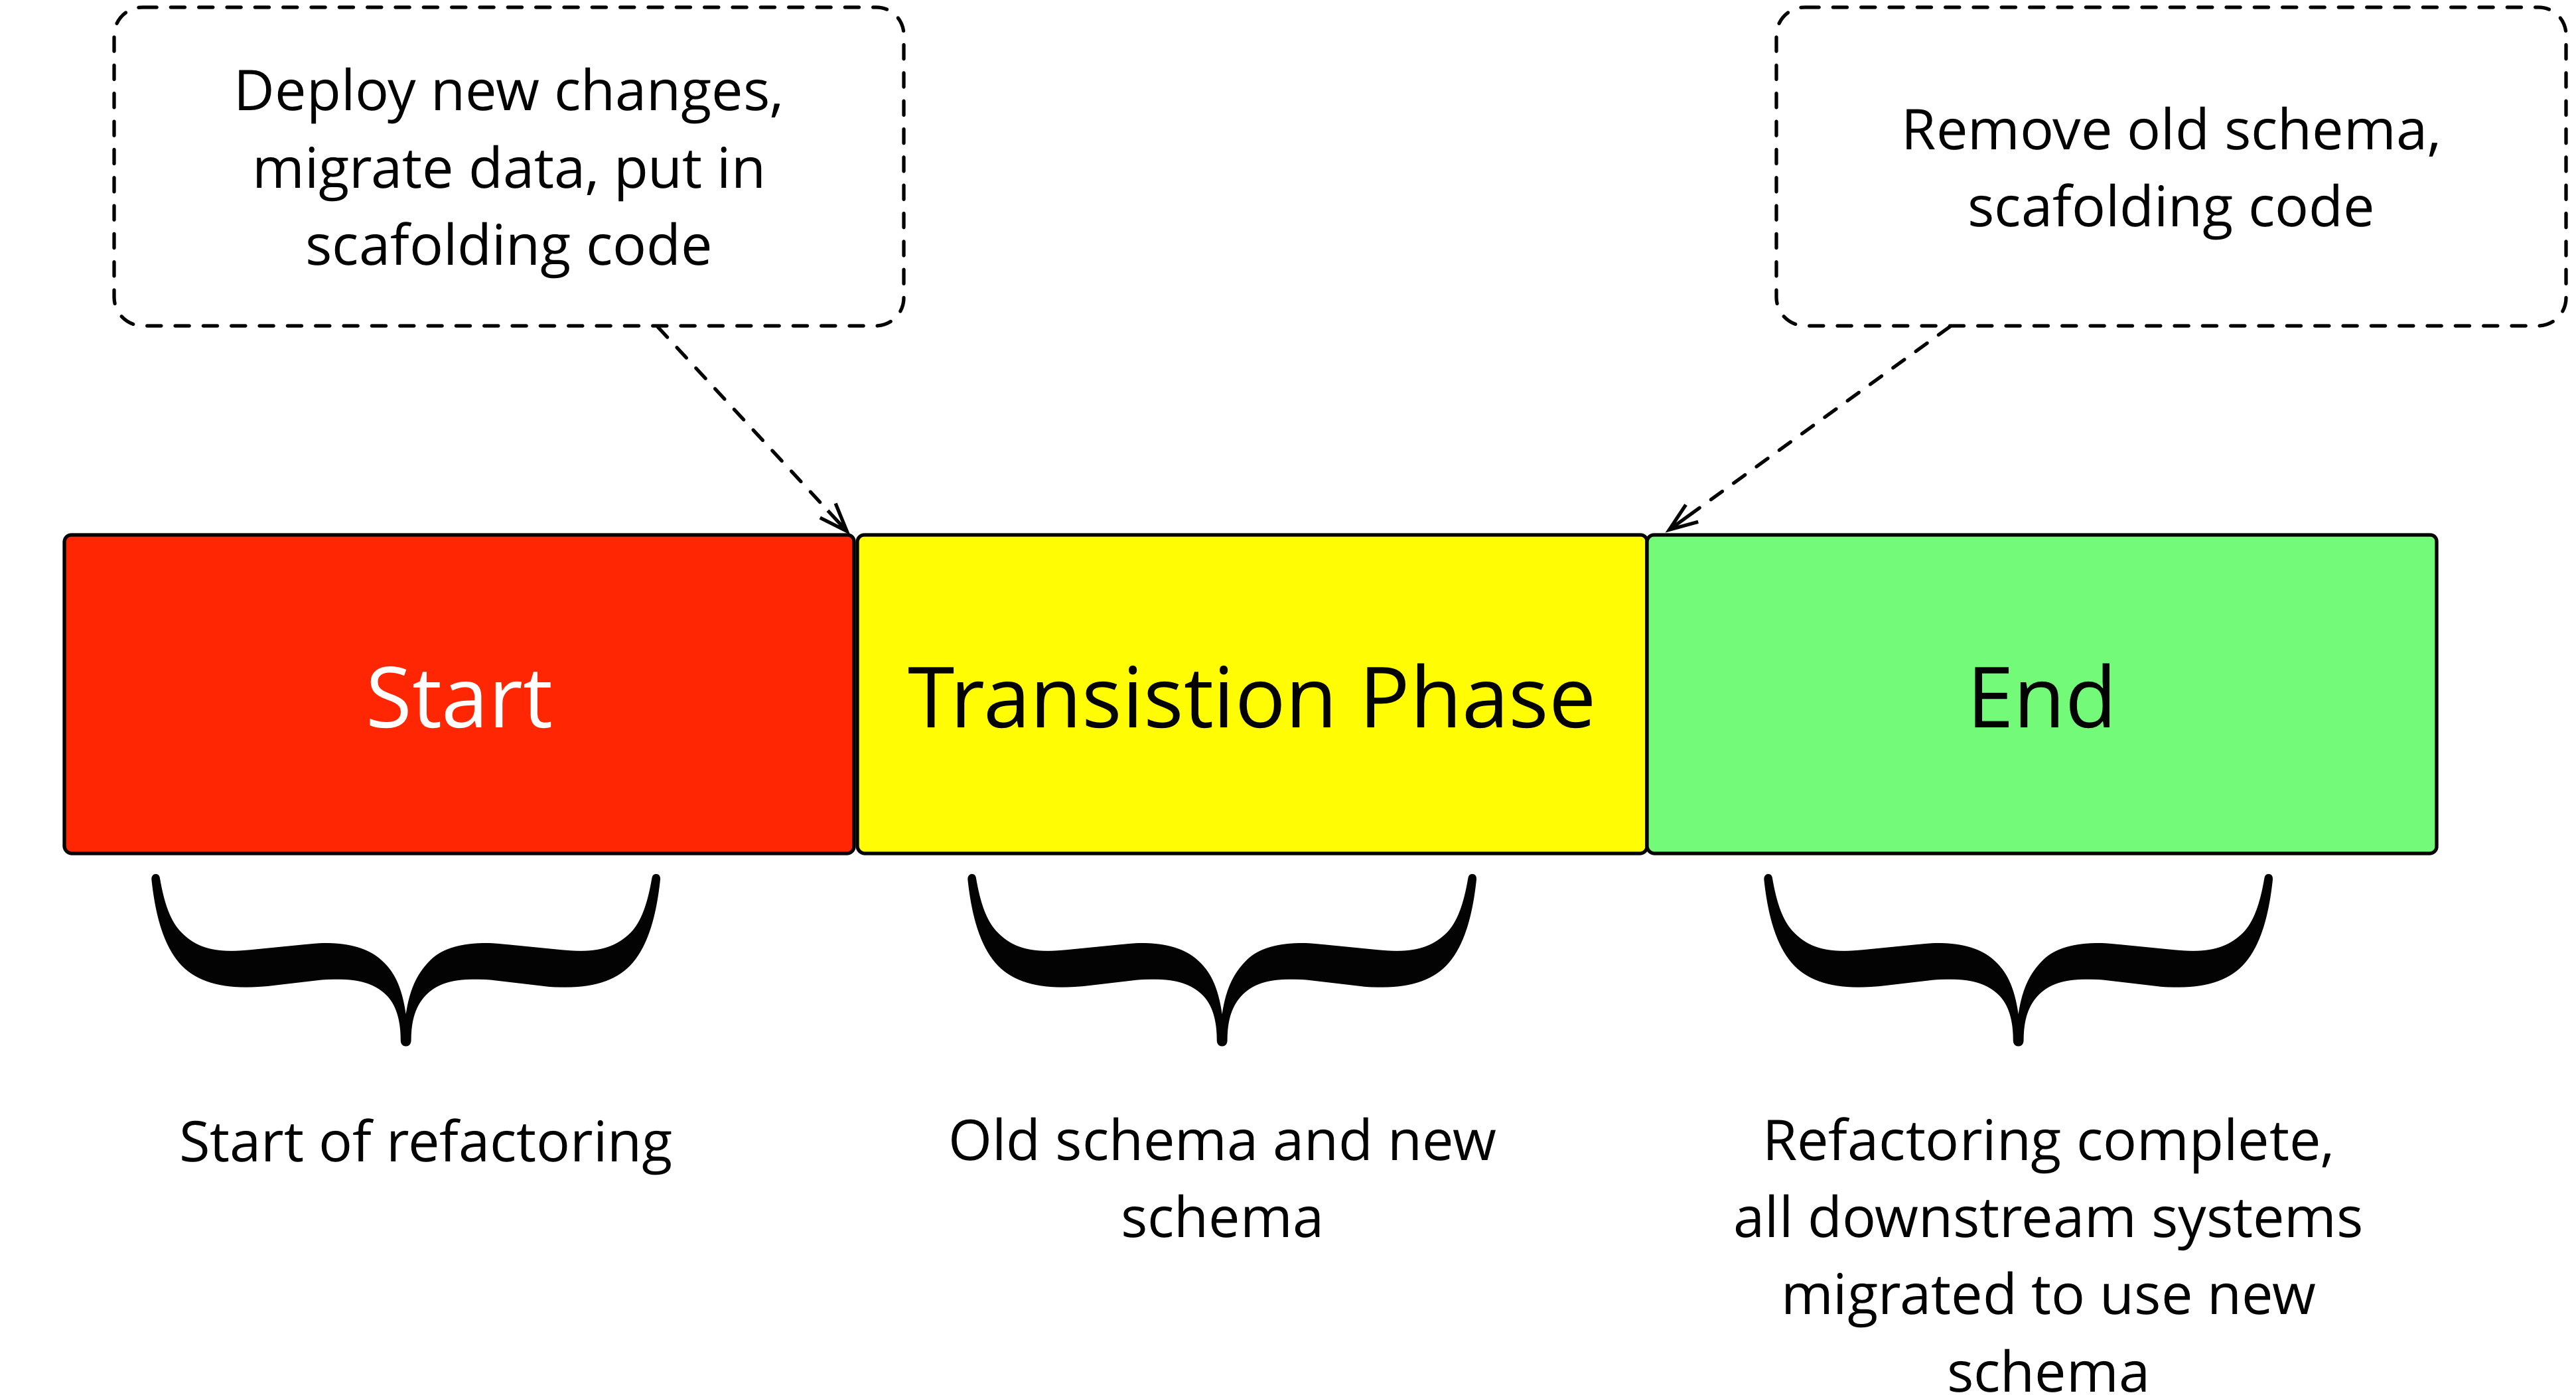
满足这种需求的常见模式,如 Martin Fowler 在 "演进式数据库设计" 中定义的, 是使用"过渡阶段"。

过渡阶段是"数据库同时支持旧访问模式和新访问模式的一段时间。 这允许旧系统按照自己的节奏迁移到新结构",如下图所示:

tutorial image 2 来源:martinfowler.com

我们计划通过 5 个简单步骤进行更改,所有步骤都是向后兼容的:

  • 创建一个名为 meta_json 的新列,类型为 JSON。
  • 部署一个执行双写的应用程序版本。每个新记录或更新都会写入新列和旧列,而读取仍然从旧列进行。
  • 将数据从旧列回填到新列。
  • 部署一个从新列读取的应用程序版本。
  • 删除旧列。

版本化迁移

在我们的项目中,我们使用 Ent 的版本化迁移工作流来 管理数据库模式。版本化迁移为团队提供了对应用程序数据库模式更改方式的精细控制。 这种控制级别对于实施我们的计划非常有用。如果您的项目使用自动迁移并希望跟随操作, 请首先升级您的项目以使用版本化迁移。

备注

同样的操作也可以使用数据迁移功能通过自动迁移完成, 但本文重点关注版本化迁移

使用 Ent 创建 JSON 列

首先,我们将向用户模式添加一个新的 JSON Ent 类型。

types/types.go
type Meta struct {
CreateTime time.Time `json:"create_time"`
UpdateTime time.Time `json:"update_time"`
}
ent/schema/user.go
func (User) Fields() []ent.Field {
return []ent.Field{
field.Bytes("meta"),
field.JSON("meta_json", &types.Meta{}).Optional(),
}
}

接下来,我们运行代码生成来更新应用程序模式:

go generate ./...

接下来,我们运行自动迁移规划脚本,生成一组包含 将数据库迁移到最新版本所需 SQL 语句的迁移文件。

go run -mod=mod ent/migrate/main.go add_json_meta_column

生成的描述更改的迁移文件:

-- modify "users" table
ALTER TABLE `users` ADD COLUMN `meta_json` json NULL;

现在,我们使用 Atlas 应用创建的迁移文件:

atlas migrate apply \
--dir "file://ent/migrate/migrations"
--url mysql://root:pass@localhost:3306/ent

结果,我们在数据库中有以下模式:

tutorial image 3

开始写入两个列

生成 JSON 类型后,我们将开始写入新列:

-       err := client.User.Create().
- SetMeta(input.Meta).
- Exec(ctx)
+ var meta types.Meta
+ if err := json.Unmarshal(input.Meta, &meta); err != nil {
+ return nil, err
+ }
+ err := client.User.Create().
+ SetMetaJSON(&meta).
+ Exec(ctx)

为了确保写入新列 meta_json 的值被复制到旧列,我们可以利用 Ent 的 Schema Hooks 功能。这需要在 main 中添加空白导入 ent/runtime注册钩子并避免循环导入:

// Hooks of the User.
func (User) Hooks() []ent.Hook {
return []ent.Hook{
hook.On(
func(next ent.Mutator) ent.Mutator {
return hook.UserFunc(func(ctx context.Context, m *gen.UserMutation) (ent.Value, error) {
meta, ok := m.MetaJSON()
if !ok {
return next.Mutate(ctx, m)
}
if b, err := json.Marshal(meta); err != nil {
return nil, err
}
m.SetMeta(b)
return next.Mutate(ctx, m)
})
},
ent.OpCreate,
),
}
}

确保写入两个字段后,我们可以安全地部署到生产环境。

从旧列回填值

现在在我们的生产数据库中有两个列:一个将 meta 对象存储为 blob,另一个将其存储为 JSON。 第二个列可能有空值,因为 JSON 列是最近才添加的,因此我们需要用旧列的值来回填它。

为此,我们手动创建一个 SQL 迁移文件,将旧 blob 列的值填充到新 JSON 列中。

备注

您也可以通过使用 WriteDriver 编写生成此数据迁移文件的 Go 代码。

创建一个新的空迁移文件:

atlas migrate new --dir file://ent/migrate/migrations

对于 users 表中每个 JSON 值为空的行(即在创建新列之前添加的行),我们尝试 将 meta 对象解析为有效的 JSON。如果成功,我们将用结果值填充 meta_json 列,否则我们将其标记为空。

我们的下一步是编辑迁移文件:

UPDATE users
SET meta_json = CASE
-- when meta is valid json stores it as is.
WHEN JSON_VALID(cast(meta as char)) = 1 THEN cast(cast(meta as char) as json)
-- if meta is not valid json, store it as an empty object.
ELSE JSON_SET('{}')
END
WHERE meta_json is null;

更改迁移文件后重新哈希迁移目录:

atlas migrate hash --dir "file://ent/migrate/migrations"

我们可以通过在本地数据库上执行所有先前的迁移文件、用临时数据填充它,然后 应用最后一个迁移来测试迁移文件,以确保我们的迁移文件按预期工作。

测试后我们应用迁移文件:

atlas migrate apply \
--dir "file://ent/migrate/migrations"
--url mysql://root:pass@localhost:3306/ent

现在,我们再次部署到生产环境。

将读取重定向到新列并删除旧的 blob 列

现在 meta_json 列中有了值,我们可以将读取从旧字段更改为新字段。

不再在每次读取时从 user.meta 解码数据,而是直接使用 meta_json 字段:

-       var meta types.Meta
- if err = json.Unmarshal(user.Meta, &meta); err != nil {
- return nil, err
- }
- if meta.CreateTime.Before(time.Unix(0, 0)) {
- return nil, errors.New("invalid create time")
- }
+ if user.MetaJSON.CreateTime.Before(time.Unix(0, 0)) {
+ return nil, errors.New("invalid create time")
+ }

重定向读取后,我们将更改部署到生产环境。

删除旧列

现在可以从 Ent 模式中删除描述旧列的字段,因为我们不再使用它了。

func (User) Fields() []ent.Field {
return []ent.Field{
- field.Bytes("meta"),
field.JSON("meta_json", &types.Meta{}).Optional(),
}
}

启用删除列功能,再次生成 Ent 模式。

go run -mod=mod ent/migrate/main.go drop_user_meta_column

现在我们已经正确创建了新字段、重定向了写入、回填了数据并删除了旧列 - 我们准备好进行最终部署了。剩下的就是将代码合并到版本控制并部署到生产环境!

总结

在这篇文章中,我们讨论了如何使用与 Ent 集成的 Atlas 版本迁移在生产数据库中零停机地更改列类型。

有问题?需要入门帮助?欢迎加入我们的 Ent Discord 服务器

获取更多 Ent 新闻和更新:

· 阅读需 8 分钟

概要

  • 大多数关系型数据库支持存储非结构化 JSON 值的列。
  • Ent 对在关系型数据库中处理 JSON 值有很好的支持。
  • 如何以原子方式向 JSON 数组追加值。
  • Ent 最近添加了对原子追加 JSON 值中字段的支持。

SQL 数据库中的 JSON 值

尽管关系型数据库主要以存储结构化表格数据而闻名,但几乎所有现代关系型数据库都支持 JSON 列,用于在表列中存储非结构化数据。例如,在 MySQL 中,你可以创建这样一个表:

CREATE TABLE t1 (jdoc JSON);

在这个列中,用户可以存储任意结构的 JSON 对象:

INSERT INTO t1 VALUES('{"key1": "value1", "key2": "value2"}');

因为 JSON 文档总是可以表示为字符串,所以它们可以存储在常规的 VARCHAR 或 TEXT 列中。然而,当列被声明为 JSON 类型时,数据库会强制验证 JSON 语法的正确性。例如,如果我们尝试向这个 MySQL 表写入一个不正确的 JSON 文档:

INSERT INTO t1 VALUES('[1, 2,');

我们将收到这个错误:

ERROR 3140 (22032) at line 2: Invalid JSON text:
"Invalid value." at position 6 in value (or column) '[1, 2,'.

此外,存储在 JSON 文档中的值可以在 SELECT 语句中使用 JSON Path 表达式访问,也可以在谓词(WHERE 子句)中用于过滤数据:

select c->'$.hello' as greeting from t where c->'$.hello' = 'world';;

得到:

+--------------+
| greeting |
+--------------+
| "world" |
+--------------+
1 row in set (0.00 sec)

Ent 中的 JSON 值

使用 Ent,用户可以通过 field.JSON 在 schema 中定义 JSON 字段,传入所需的字段名和对应的 Go 类型。例如:

type Tag struct {
Name string `json:"name"`
Created time.Time `json:"created"`
}

func (User) Fields() []ent.Field {
return []ent.Field{
field.JSON("tags", []Tag{}),
}
}

Ent 提供了便捷的 API 用于读写 JSON 列的值,以及应用谓词(使用 sqljson):

func TestEntJSON(t *testing.T) {
client := enttest.Open(t, "sqlite3", "file:ent?mode=memory&cache=shared&_fk=1")
ctx := context.Background()
// Insert a user with two comments.
client.User.Create().
SetTags([]schema.Tag{
{Name: "hello", Created: time.Now()},
{Name: "goodbye", Created: time.Now()},
}).
SaveX(ctx)

// Count how many users have more than zero tags.
count := client.User.Query().
Where(func(s *sql.Selector) {
s.Where(
sqljson.LenGT(user.FieldTags, 0),
)
}).
CountX(ctx)
fmt.Printf("count: %d", count)
// Prints: count: 1
}

向 JSON 列中的字段追加值

在很多情况下,向 JSON 列中的列表追加值是很有用的。最好以 原子 方式实现追加,也就是说,不需要先读取当前值再写入整个新值。原因是如果两个调用尝试同时追加值,它们都会从数据库读取相同的 当前 值,然后大约在同一时间写入各自更新后的版本。除非使用了乐观锁,否则两次写入都会成功,但最终结果只会包含其中一个新值。

为了克服这种竞态条件,我们可以通过使用巧妙的 UPDATE 查询让数据库来处理两个调用之间的同步。这个解决方案的思路类似于许多应用程序中计数器递增的方式。不是运行:

SELECT points from leaderboard where user='rotemtam' 

读取结果(假设是 1000),在程序中递增值(1000+1=1001),然后写入新的总和:

UPDATE leaderboard SET points=1001 where user='rotemtam'

开发者可以使用这样的查询:

UPDATE leaderboard SET points=points+1 where user='rotemtam'

为了避免使用乐观锁或其他机制来同步写入,让我们看看如何类似地利用数据库的能力以安全的方式并发执行它们。

在构建这个查询时有两点需要注意。首先,处理 JSON 值的语法在不同数据库厂商之间略有不同,你将在下面的示例中看到。其次,向 JSON 文档中的列表追加值的查询需要处理至少两种边缘情况:

  1. 我们要追加的字段在 JSON 文档中还不存在。
  2. 字段存在但被设置为 JSON null

以下是在不同方言中向表 t 的列 c 中名为 a 的字段追加值 new_val 的查询示例:

UPDATE `t` SET `c` = CASE
WHEN
(JSON_TYPE(JSON_EXTRACT(`c`, '$.a')) IS NULL
OR JSON_TYPE(JSON_EXTRACT(`c`, '$.a')) = 'NULL')
THEN
JSON_SET(`c`, '$.a', JSON_ARRAY('new_val'))
ELSE
JSON_ARRAY_APPEND(`c`, '$.a', 'new_val')
END

使用 Ent 向 JSON 字段追加值

Ent 最近添加了对原子追加 JSON 列中字段值的支持。让我们看看如何使用它。

如果 JSON 字段的底层类型是切片,例如:

// Fields of the User.
func (User) Fields() []ent.Field {
return []ent.Field{
field.JSON("tags", []string{}),
}
}

Ent 将在更新 mutation 构建器上生成 AppendTags 方法。你可以这样使用它们:

func TestAppend(t *testing.T) {
client := enttest.Open(t, "sqlite3", "file:ent?mode=memory&cache=shared&_fk=1")
ctx := context.Background()
// Insert a user with two tags.
u := client.User.Create().
SetTags([]string{"hello", "world"}).
SaveX(ctx)

u.Update().AppendTags([]string{"goodbye"}).ExecX(ctx)

again := client.User.GetX(ctx, u.ID)
fmt.Println(again.Tags)
// Prints: [hello world goodbye]
}

如果 JSON 字段的底层类型是包含列表的结构体,例如:

type Meta struct {
Tags []string `json:"tags"'`
}

// Fields of the User.
func (User) Fields() []ent.Field {
return []ent.Field{
field.JSON("meta", &Meta{}),
}
}

你可以使用自定义 sql/modifier 选项让 Ent 生成 Modify 方法,你可以这样使用它:

func TestAppendSubfield(t *testing.T) {
client := enttest.Open(t, "sqlite3", "file:ent?mode=memory&cache=shared&_fk=1")
ctx := context.Background()
// Insert a user with two tags.
u := client.User.Create().
SetMeta(&schema.Meta{
Tags: []string{"hello", "world"},
}).
SaveX(ctx)

u.Update().
Modify(func(u *sql.UpdateBuilder) {
sqljson.Append(u, user.FieldMeta, []string{"goodbye"}, sqljson.Path("tags"))
}).
ExecX(ctx)

again := client.User.GetX(ctx, u.ID)
fmt.Println(again.Meta.Tags)
// Prints: [hello world goodbye]
}

总结

在这篇文章中,我们讨论了 SQL 和 Ent 中的 JSON 字段。接下来,我们讨论了如何在流行的 SQL 数据库中原子地向 JSON 字段追加值。最后,我们展示了如何使用 Ent 来实现这一点。你认为 Remove/Slice 操作是必要的吗?让我们知道你的想法!

获取更多 Ent 新闻和更新:

· 阅读需 10 分钟

为了确保软件质量,团队通常会采用持续集成工作流,通常称为 CI。通过 CI,团队可以针对代码库的每次变更持续运行一系列自动化验证。在 CI 过程中,团队可以运行多种验证:

  • 编译或构建最新版本,确保没有损坏。
  • 代码检查(Linting)以强制执行已接受的代码风格标准。
  • 单元测试,验证各个组件按预期工作,并确保对代码库的更改不会导致其他区域出现回归问题。
  • 安全扫描,确保没有已知漏洞引入代码库。
  • 以及更多!

通过与 Ent 社区的讨论,我们了解到许多使用 Ent 的团队已经在使用 CI,并希望在他们的工作流中强制执行一些 Ent 特定的验证。

为了支持社区的这一努力,我们在文档中添加了一个新的指南,记录了 CI 中常见的最佳实践验证,并介绍了 ent/contrib/ci:我们维护的一个 GitHub Action,将这些最佳实践编码化。

在这篇文章中,我想分享一些关于如何将 CI 整合到你的 Ent 项目的初步建议。在文章末尾,我将分享我们正在进行的项目的一些见解,并希望获得社区的反馈。

验证所有生成的文件已提交

Ent 严重依赖代码生成。根据我们的经验,生成的代码应该始终提交到源代码管理中。这样做有两个原因:

  • 如果生成的代码被提交到源代码管理中,它可以与主应用程序代码一起阅读。在代码审查或浏览仓库时,生成的代码的存在对于全面了解事物的工作方式至关重要。
  • 团队成员之间开发环境的差异可以很容易地被发现和修复。这进一步降低了"在我的机器上可以运行"类型问题的可能性,因为每个人都在运行相同的代码。

如果你使用 GitHub 进行源代码管理,使用 ent/contrib/ci GitHub Action 可以很容易地验证所有生成的文件是否已提交。 否则,我们提供一个简单的 bash 脚本,你可以将其集成到你现有的 CI 流程中。

只需在你的仓库中添加一个名为 .github/workflows/ent-ci.yaml 的文件:

name: EntCI
on:
push:
# Run whenever code is changed in the master.
branches:
- master
# Run on PRs where something changed under the `ent/` directory.
pull_request:
paths:
- 'ent/*'
jobs:
ent:
runs-on: ubuntu-latest
steps:
- uses: actions/checkout@v3.0.1
- uses: actions/setup-go@v3
with:
go-version: 1.18
- uses: ent/contrib/ci@master

检查迁移文件

对项目 Ent 模式的更改几乎总是会导致数据库的修改。如果你正在使用版本化迁移来管理数据库模式的变更,你可以在持续集成流程中运行迁移检查。这样做有多个原因:

  • 检查会在数据库容器上重放你的迁移目录,确保所有 SQL 语句都是有效的并且顺序正确。
  • 强制执行迁移目录完整性 - 确保历史记录没有被意外更改,并且并行计划的迁移被统一为干净的线性历史。
  • 检测破坏性更改,在迁移到达生产数据库之前通知你任何可能导致数据丢失的潜在风险。
  • 检查会检测在部署时可能失败的数据依赖更改,这些更改需要你更仔细地审查。

如果你使用 GitHub,可以使用官方 Atlas Action在 CI 期间运行迁移检查。

.github/workflows/atlas-ci.yaml 添加到你的仓库,内容如下:

name: Atlas CI
on:
# Run whenever code is changed in the master branch,
# change this to your root branch.
push:
branches:
- master
# Run on PRs where something changed under the `ent/migrate/migrations/` directory.
pull_request:
paths:
- 'ent/migrate/migrations/*'
jobs:
lint:
services:
# Spin up a mysql:8.0.29 container to be used as the dev-database for analysis.
mysql:
image: mysql:8.0.29
env:
MYSQL_ROOT_PASSWORD: pass
MYSQL_DATABASE: test
ports:
- 3306:3306
options: >-
--health-cmd "mysqladmin ping -ppass"
--health-interval 10s
--health-start-period 10s
--health-timeout 5s
--health-retries 10
runs-on: ubuntu-latest
steps:
- uses: actions/checkout@v3.0.1
with:
fetch-depth: 0 # Mandatory unless "latest" is set below.
- uses: ariga/atlas-action@v0
with:
dir: ent/migrate/migrations
dir-format: golang-migrate # Or: atlas, goose, dbmate
dev-url: mysql://root:pass@localhost:3306/test

请注意,运行 atlas migrate lint 需要一个干净的 dev-database,这由上述示例代码中的 services 块提供。

Ent CI 的下一步

在这个modest的开始之上,我想分享一些我们在 Ariga 正在试验的功能,希望获得社区的反馈。

  • 在线迁移检查 - 许多 Ent 项目使用 Ent 中提供的自动模式迁移机制(在应用程序启动时使用 ent.Schema.Create)。假设项目的源代码由版本控制系统(如 Git)管理,我们将主线分支(master/main/等)中的模式与当前功能分支中的模式进行比较,并使用 Atlas 的模式差异功能来计算将在数据库上运行的 SQL 语句。然后我们可以使用 Atlas 的检查功能来提供有关拟议更改可能带来的危险的见解。
  • 变更可视化 - 为了帮助审查者理解特定拉取请求中提议的更改的影响,我们生成一个可视化差异(使用类似于 entviz 的 ERD)来反映项目模式的变更。
  • 模式检查 - 使用官方的 go/analysis 包创建检查器,分析 Ent 模式的 Go 代码,并在模式定义级别强制执行策略(如命名或索引约定)。

总结

在这篇文章中,我们介绍了 CI 的概念,并讨论了如何在 Ent 项目中实践 CI。接下来,我们展示了我们在内部试验的 CI 检查。如果你希望看到这些检查成为 Ent 的一部分,或者有其他关于为 Ent 提供 CI 工具的想法,请在 Ent Discord 服务器上联系我们。

获取更多 Ent 新闻和更新:

· 阅读需 12 分钟

五周前,我们发布了一个期待已久的 Ent 数据库变更管理功能:版本化迁移。在公告博客文章中,我们简要介绍了声明式和基于变更的两种方法来保持数据库模式与应用程序同步,以及它们各自的缺点,以及为什么 Atlas(Ent 底层迁移引擎)尝试将两种方法的优点融合到一个工作流程中是值得一试的。我们称之为版本化迁移编写,如果你还没有阅读过,现在是个好时机!

通过版本化迁移编写,生成的迁移文件仍然是"基于变更的",但已经由 Atlas 引擎安全地规划好了。这意味着你在使用 Ent 开发服务时,仍然可以使用你喜欢的迁移管理工具,如 FlywayLiquibasegolang-migrate/migratepressly/goose

在这篇博客文章中,我想向你展示 Atlas 项目的另一个新功能,我们称之为迁移目录完整性文件,它现在已在 Ent 中得到支持,以及你如何将它与任何你已经熟悉和喜欢的迁移管理工具一起使用。

问题

使用版本化迁移时,开发人员需要注意以下几点,以避免破坏数据库:

  1. 追溯性地修改已经运行过的迁移。
  2. 意外地改变迁移的组织顺序。
  3. 提交语义不正确的 SQL 脚本。

理论上,代码审查应该能够防止团队合并带有这些问题的迁移。然而,根据我的经验,有很多种错误可能会逃过人眼,使得这种方法容易出错。因此,自动化防止这些错误的方式要安全得多。

第一个问题(修改历史)被大多数管理工具通过将已应用迁移文件的哈希值保存到托管数据库并与文件进行比较来解决。如果它们不匹配,迁移可以被中止。然而,这发生在开发周期的很晚阶段(部署期间),如果能更早检测到,可以节省时间和资源。

对于第二个(和第三个)问题,考虑以下场景:

atlas-versioned-migrations-no-conflict

这个图表显示了两个未被检测到的可能错误。第一个是迁移文件的顺序问题。

团队 A 和团队 B 大约在同一时间分支出一个功能。团队 B 生成了一个版本时间戳为 x 的迁移文件并继续开发功能。团队 A 在稍后的时间点生成了一个迁移文件,因此迁移版本时间戳为 x+1。团队 A 完成功能并合并到 master 分支,可能自动部署到生产环境并应用了迁移版本 x+1。到目前为止没有问题。

现在,团队 B 合并了其迁移版本为 x 的功能,这个版本早于已经应用的版本 x+1。如果代码审查过程没有检测到这一点,迁移文件就会进入生产环境,现在取决于特定的迁移管理工具来决定会发生什么。

大多数工具都有自己的解决方案,例如 pressly/goose 采用了一种他们称之为混合版本控制的方法。在我向你介绍 Atlas(Ent)处理这个问题的独特方式之前,让我们快速看一下第三个问题:

如果团队 A 和团队 B 都在开发一个需要新表或列的功能,并且他们给它们起了相同的名称(例如 users),他们可能都会生成创建该表的语句。虽然先合并的团队的迁移会成功,但第二个团队的迁移会失败,因为表或列已经存在。

解决方案

Atlas 有一种独特的方式来处理上述问题。目标是尽早引起对问题的关注。在我们看来,最好的地方是在产品的版本控制和持续集成(CI)部分。Atlas 的解决方案是引入一个我们称之为迁移目录完整性文件的新文件。它只是另一个名为 atlas.sum 的文件,与迁移文件一起存储,包含有关迁移目录的一些元数据。它的格式受到 Go 模块的 go.sum 文件的启发,看起来类似于这样:

h1:KRFsSi68ZOarsQAJZ1mfSiMSkIOZlMq4RzyF//Pwf8A=
20220318104614_team_A.sql h1:EGknG5Y6GQYrc4W8e/r3S61Aqx2p+NmQyVz/2m8ZNwA=

atlas.sum 文件的第一个条目包含整个目录的总和,以及每个迁移文件的校验和(通过反向单分支 merkle 哈希树实现)。让我们看看如何使用这个文件在版本控制和 CI 中检测上述情况。我们的目标是提醒两个团队都添加了迁移,并且在继续合并之前很可能需要检查它们。

备注

要跟随操作,运行以下命令快速获得一个可工作的示例。它们将:

  1. 创建一个 Go 模块并下载所有需要的依赖
  2. 创建一个非常基本的 User 模式
  3. 启用版本化迁移功能
  4. 运行代码生成
  5. 启动一个 MySQL docker 容器供使用(使用 docker stop atlas-sum 删除)
mkdir ent-sum-file
cd ent-sum-file
go mod init ent-sum-file
go install entgo.io/ent/cmd/ent@master
go run entgo.io/ent/cmd/ent new User
sed -i -E 's|^//go(.*)$|//go\1 --feature sql/versioned-migration|' ent/generate.go
go generate ./...
docker run --rm --name atlas-sum --detach --env MYSQL_ROOT_PASSWORD=pass --env MYSQL_DATABASE=ent -p 3306:3306 mysql

第一步是通过使用 schema.WithSumFile() 选项告诉迁移引擎创建和管理 atlas.sum 文件。下面的示例使用实例化的 Ent 客户端来生成新的迁移文件:

package main

import (
"context"
"log"
"os"

"ent-sum-file/ent"

"ariga.io/atlas/sql/migrate"
"entgo.io/ent/dialect/sql/schema"
_ "github.com/go-sql-driver/mysql"
)

func main() {
client, err := ent.Open("mysql", "root:pass@tcp(localhost:3306)/ent")
if err != nil {
log.Fatalf("failed connecting to mysql: %v", err)
}
defer client.Close()
ctx := context.Background()
// Create a local migration directory.
dir, err := migrate.NewLocalDir("migrations")
if err != nil {
log.Fatalf("failed creating atlas migration directory: %v", err)
}
// Write migration diff.
err = client.Schema.NamedDiff(ctx, os.Args[1], schema.WithDir(dir), schema.WithSumFile())
if err != nil {
log.Fatalf("failed creating schema resources: %v", err)
}
}

创建迁移目录并运行上述命令后,你应该会看到与 golang-migrate/migrate 兼容的迁移文件,以及 atlas.sum 文件,内容如下:

mkdir migrations
go run -mod=mod main.go initial
20220504114411_initial.up.sql
-- create "users" table
CREATE TABLE `users` (`id` bigint NOT NULL AUTO_INCREMENT, PRIMARY KEY (`id`)) CHARSET utf8mb4 COLLATE utf8mb4_bin;

20220504114411_initial.down.sql
-- reverse: create "users" table
DROP TABLE `users`;

atlas.sum
h1:SxbWjP6gufiBpBjOVtFXgXy7q3pq1X11XYUxvT4ErxM=
20220504114411_initial.down.sql h1:OllnelRaqecTrPbd2YpDbBEymCpY/l6ihbyd/tVDgeY=
20220504114411_initial.up.sql h1:o/6yOczGSNYQLlvALEU9lK2/L6/ws65FrHJkEk/tjBk=

如你所见,atlas.sum 文件为每个生成的迁移文件包含一个条目。启用 atlas.sum 生成文件后,团队 A 和团队 B 在为模式更改生成迁移时都会有这样的文件。现在,当第二个团队尝试合并他们的功能时,版本控制将引发合并冲突。

atlas-versioned-migrations-no-conflict

备注

在以下步骤中,我们通过调用 go run -mod=mod ariga.io/atlas/cmd/atlas 来调用 Atlas CLI,但你也可以按照此处的安装说明将 CLI 全局安装到你的系统中(然后只需调用 atlas)。

你可以随时使用以下命令检查你的 atlas.sum 文件是否与迁移目录同步(现在不应该输出任何错误):

go run -mod=mod ariga.io/atlas/cmd/atlas migrate validate

然而,如果你碰巧对迁移文件进行了手动更改,比如添加新的 SQL 语句、编辑现有语句或甚至创建一个全新的文件,atlas.sum 文件将不再与迁移目录的内容同步。此时尝试为模式更改生成新的迁移文件将被 Atlas 迁移引擎阻止。通过创建一个新的空迁移文件并再次运行 main.go 来尝试一下:

go run -mod=mod ariga.io/atlas/cmd/atlas migrate new migrations/manual_version.sql --format golang-migrate
go run -mod=mod main.go initial
# 2022/05/04 15:08:09 failed creating schema resources: validating migration directory: checksum mismatch
# exit status 1

atlas migrate validate 命令会告诉你同样的信息:

go run -mod=mod ariga.io/atlas/cmd/atlas migrate validate
# Error: checksum mismatch
#
# You have a checksum error in your migration directory.
# This happens if you manually create or edit a migration file.
# Please check your migration files and run
#
# 'atlas migrate hash --force'
#
# to re-hash the contents and resolve the error.
#
# exit status 1

为了让 atlas.sum 文件重新与迁移目录同步,我们可以再次使用 Atlas CLI:

go run -mod=mod ariga.io/atlas/cmd/atlas migrate hash --force

作为安全措施,Atlas CLI 不会在迁移目录与其 atlas.sum 文件不同步时对其进行操作。因此,你需要在命令中添加 --force 标志。

对于开发人员在手动更改后忘记更新 atlas.sum 文件的情况,你可以在 CI 中添加 atlas migrate validate 调用。我们正在积极开发一个 GitHub action 和 CI 解决方案,可以为你开箱即用地完成这项(以及其他)工作。

总结

在这篇文章中,我们简要介绍了使用基于变更的 SQL 文件时模式迁移的常见问题来源,并介绍了基于 Atlas 项目的解决方案,使迁移更加安全。

有问题?需要入门帮助?欢迎加入我们的 Ent Discord 服务器

更多 Ent 新闻和更新:

· 阅读需 8 分钟

Twitter 的"编辑按钮"功能因 Elon Musk 发起的投票推文(询问用户是否需要此功能)而登上头条。

Elons Tweet

毫无疑问,这是 Twitter 上呼声最高的功能之一。

作为一名软件开发者,我立刻开始思考如何自己实现这个功能。追踪/审计问题在许多应用程序中非常常见。如果你有一个实体(比如 Tweet),并且想要追踪其某个字段(比如 content 字段)的变更,有很多常见的解决方案。一些数据库甚至有专有的解决方案,如 Microsoft 的变更追踪和 MariaDB 的系统版本表。然而,在大多数用例中,你必须自己"拼接"实现。幸运的是,Ent 提供了一个模块化的扩展系统,让你只需几行代码就能接入这样的功能。

Twitter+Edit Button

如果可以的话

Ent 简介

Ent 是一个用于 Go 语言的实体框架,使大型应用程序的开发变得轻而易举。Ent 开箱即用,预装了许多出色的功能,例如:

借助 Ent 的代码生成引擎和高级扩展系统,你可以轻松地为 Ent 客户端模块化添加高级功能,这些功能通常手动实现非常耗时。例如:

Enthistory

enthistory 是我们在想要为某个 Web 服务添加"活动与历史"面板时开始开发的扩展。该面板的作用是展示谁在何时修改了什么(即审计功能)。在 Atlas(一个使用声明式 HCL 文件管理数据库的工具)中,我们有一个名为"schema"的实体,它本质上是一个大型文本块。对 schema 的任何更改都会被记录下来,并可以在"活动与历史"面板中查看。

Activity and History

Atlas 中的"活动与历史"界面

这个功能非常常见,可以在许多应用中找到,如 Google 文档、GitHub PR 和 Facebook 帖子,但遗憾的是在备受欢迎的 Twitter 上却没有。

超过 300 万人投票支持为 Twitter 添加"编辑按钮",所以让我来展示一下 Twitter 如何轻松地让用户满意!

使用 Enthistory,你只需像这样简单地注解你的 Ent schema:

func (Tweet) Fields() []ent.Field {
return []ent.Field{
field.String("content").
Annotations(enthistory.TrackField()),
field.Time("created").
Default(time.Now),
}
}

Enthistory 会挂钩到你的 Ent 客户端,确保对"Tweet"的每个 CRUD 操作都被记录到"tweets_history"表中,无需修改代码,并提供 API 来消费这些记录:

// Creating a new Tweet doesn't change. enthistory automatically modifies
// your transaction on the fly to record this event in the history table
client.Tweet.Create().SetContent("hello world!").SaveX(ctx)

// Querying history changes is as easy as querying any other entity's edge.
t, _ := client.Tweet.Get(ctx, id)
hs := client.Tweet.QueryHistory(t).WithChanges().AllX(ctx)

让我们看看如果不使用 Enthistory 你需要做什么:例如,考虑一个类似 Twitter 的应用。它有一个名为"tweets"的表,其中一列是推文内容。

idcontentcreated_atauthor_id
1Hello Twitter!2022-04-06T13:45:34+00:00123
2Hello Gophers!2022-04-06T14:03:54+00:00456

现在,假设我们想允许用户编辑内容,同时在前端显示更改。解决这个问题有几种常见的方法,每种方法都有其优缺点,但我们将在另一篇技术文章中深入探讨。目前,一个可能的解决方案是创建一个"tweets_history"表来记录推文的更改:

idtweet_idtimestampeventcontent
112022-04-06T12:30:00+00:00CREATEDhello world!
222022-04-06T13:45:34+00:00UPDATEDhello Twitter!

使用类似上面的表,我们可以记录对原始推文"1"的更改,如果需要,我们可以显示它最初在 12:30:00 发布,内容为"hello world!",并在 13:45:34 修改为"hello Twitter!"。

要实现这一点,我们必须将每个对"tweets"的 UPDATE 语句更改为包含对"tweets_history"的 INSERT。为了正确性,我们需要将两个语句包装在一个事务中,以避免在第一个语句成功但后续语句失败的情况下损坏历史记录。我们还需要确保每个对"tweets"的 INSERT 都与对"tweets_history"的 INSERT 配对

# INSERT is logged as "CREATE" history event
- INSERT INTO tweets (`content`) VALUES ('Hello World!');
+BEGIN;
+INSERT INTO tweets (`content`) VALUES ('Hello World!');
+INSERT INTO tweets_history (`content`, `timestamp`, `record_id`, `event`)
+VALUES ('Hello World!', NOW(), 1, 'CREATE');
+COMMIT;

# UPDATE is logged as "UPDATE" history event
- UPDATE tweets SET `content` = 'Hello World!' WHERE id = 1;
+BEGIN;
+UPDATE tweets SET `content` = 'Hello World!' WHERE id = 1;
+INSERT INTO tweets_history (`content`, `timestamp`, `record_id`, `event`)
+VALUES ('Hello World!', NOW(), 1, 'UPDATE');
+COMMIT;

这种方法很好,但你必须为不同的实体创建另一个表("comment_history"、"settings_history")。为了避免这种情况,Enthistory 创建一个单独的"history"表和一个单独的"changes"表,并在其中记录所有被追踪的字段。它还支持多种类型的字段,无需添加更多列。

预发布

Enthistory 仍处于早期设计阶段,正在进行内部测试。因此,我们尚未将其开源发布,但计划很快这样做。 如果你想尝试 Enthistory 的预发布版本,我编写了一个简单的 React 应用程序,使用 GraphQL+Enthistory 来演示推文编辑的效果。你可以在这里查看。欢迎分享你的反馈。

总结

我们看到了 Ent 的模块化扩展系统如何让你像安装一个包一样简化高级功能的实现。开发你自己的扩展既有趣、简单又有教育意义!我邀请你自己尝试一下! 在未来,Enthistory 将用于追踪 Edges(即外键关联表)的更改,与 OpenAPI 和 GraphQL 扩展集成,并为其底层实现提供更多方法。

获取更多 Ent 新闻和更新:

· 阅读需 5 分钟

我们之前宣布了 Ent 的新迁移引擎 - Atlas。 使用 Atlas,向 Ent 添加新数据库支持变得前所未有的简单。 今天,我很高兴地宣布,使用启用了 Atlas 的最新版本 Ent,现在可以使用 TiDB 的预览支持。

Ent 可用于访问多种类型数据库中的数据,包括图数据库和关系型数据库。最常见的是,用户使用标准的开源关系型数据库,如 MySQL、MariaDB 和 PostgreSQL。随着构建基于 Ent 应用程序的团队越来越成功,需要处理更大规模的流量时,这些单节点数据库往往成为扩展的瓶颈。因此,Ent 社区的许多成员都要求支持 NewSQL 数据库,如 TiDB。

TiDB

TiDB 是一个开源的 NewSQL 数据库。它提供了许多传统数据库不具备的功能,例如:

  1. 水平扩展 - 多年来,软件架构师需要在关系型数据库提供的熟悉度和保证与 NoSQL 数据库(如 MongoDB 或 Cassandra)的横向扩展能力之间做出选择。TiDB 支持水平扩展,同时保持与 MySQL 功能的良好兼容性。
  2. HTAP(混合事务/分析处理) - 此外,数据库传统上分为分析型(OLAP)和事务型(OLTP)数据库。TiDB 打破了这种二分法,使分析和事务工作负载能够在同一个数据库上运行。
  3. 预置监控 搭配 Prometheus+Grafana - TiDB 从一开始就建立在云原生范式之上,原生支持标准的 CNCF 可观测性技术栈。

要了解更多信息,请查看官方的 TiDB 介绍

TiDB 的 Hello World

要快速创建一个 Ent+TiDB 的 "Hello World" 应用程序,请按照以下步骤操作:

  1. 使用 Docker 启动本地 TiDB 服务器:

    docker run -p 4000:4000 pingcap/tidb

    现在你应该有一个运行在端口 4000 上的 TiDB 实例。

  2. 克隆示例 hello world 仓库

    git clone https://github.com/hedwigz/tidb-hello-world.git

    在这个示例仓库中,我们定义了一个简单的 User 模式:

    ent/schema/user.go
    func (User) Fields() []ent.Field {
    return []ent.Field{
    field.Time("created_at").
    Default(time.Now),
    field.String("name"),
    field.Int("age"),
    }
    }

    然后,我们将 Ent 与 TiDB 连接起来:

    main.go
    client, err := ent.Open("mysql", "root@tcp(localhost:4000)/test?parseTime=true")
    if err != nil {
    log.Fatalf("failed opening connection to tidb: %v", err)
    }
    defer client.Close()
    // Run the auto migration tool, with Atlas.
    if err := client.Schema.Create(context.Background(), schema.WithAtlas(true)); err != nil {
    log.Fatalf("failed printing schema changes: %v", err)
    }

    注意在第 1 行,我们使用 mysql 方言连接到 TiDB 服务器。这是因为 TiDB 兼容 MySQL,不需要任何特殊的驱动程序。
    尽管如此,TiDB 和 MySQL 之间存在一些差异,特别是在模式迁移方面,如信息模式检查和迁移规划。因此,Atlas 会自动检测是否连接到 TiDB 并相应地处理迁移。
    另外,注意在第 7 行我们使用了 schema.WithAtlas(true),这标志着 Ent 使用 Atlas 作为其 迁移引擎。

    最后,我们创建一个用户并将记录保存到 TiDB,以便稍后查询和打印。

    main.go
    client.User.Create().
    SetAge(30).
    SetName("hedwigz").
    SaveX(context.Background())
    user := client.User.Query().FirstX(context.Background())
    fmt.Printf("the user: %s is %d years old\n", user.Name, user.Age)
  3. 运行示例程序:

    $ go run main.go
    the user: hedwigz is 30 years old

太棒了!在这个快速演练中,我们成功地:

  • 启动了一个本地 TiDB 实例。
  • 将 Ent 与 TiDB 连接。
  • 使用 Atlas 迁移我们的 Ent 模式。
  • 使用 Ent 向 TiDB 插入和查询数据。

预览支持

Atlas 与 TiDB 的集成已在 TiDB 版本 v5.4.0(撰写本文时为 latest)上进行了充分测试,我们将在未来扩展支持。 如果你正在使用其他版本的 TiDB 或需要帮助,请随时提交 issue 或加入我们的 Discord 频道

获取更多 Ent 新闻和更新: